The Web API Service
The REST API autonomous service ( aka Web API Service ) is a service to monitor/Manage Artica in autonomous mode
This service can be implemented in autonomous mode.
This means it does not need the Web console service that running on the 9000 port to be available and can be managed using command-line
It is implemented on latest Official 4.30 Service Pack version 141 or above. And can be implemented as patch for Artica v4.30xIt requires a valid Enterprise License
The API is used to monitor and maintain several Artica servers inside a local network.
Do not expose the API port on Internet.
We strongly suggest enabling and configuring network restrictions in order to reduce possibility to access to the API from any unknown remote nodes.
Installing the patch (Artica versions before Service Pack version 141)
Installing the patch (After v4.30 Service Pack version 151)
Active Directory operations on Proxy service
Re-join the Active Directory domain
http://server:port/ntlm_connect (v1.x, v2.x)
http://server:port/proxy/ntlm/connect (v2.x)Connect from the Active Directory and made a new connection (NTLM)
http://server:port/kerberos_connect (v1.x, v2.x)
http://server:port/proxy/kerberos/connect (v2.x)Connect from the Active Directory (Kerberos method - v1.141)
Disconnect from the Active Directory domain
http://server:port/ntlm_disconnect (v1.x, v2.x)
http://server:port/proxy/ntlm/disconnect (v2.x)Disconnect from the Active Directory (NTLM)
http://server:port/kerberos_disconnect (v1.x, v2.x)
http://server:port/proxy/kerberos/disconnect (v2.x)Disconnect from the Active Directory (Kerberos method - v1.141)
Turn on the Active Directory Emergency.
Disconnect the proxy from the Active Directory and pass all users without need to be authenticated.
http://server:port/emergency_enable (v1.x, v2.x)
http://server:port/proxy/auth/emergency/enable (v2.x)
Turn off the Active Directory Emergency
Reconfigure the proxy service to authenticate users.
http://server:port/emergency_disable (1.x, v2.x)
http://server:port/proxy/auth/emergency/enable (v2.x)
System management
Services monitoring
Get the status and metrics of all monitored services.
http://server:port/system/services
- Manage Networks and Hostname
- Change Root password.
- How to Manage OpenSSH service
- Manage Proxy settings for Artica itself
- Manage the Artica Software package
- Manage the Artica Web console service
- Manage Certificates center
- Manage Debian system packages
Backup and restore
DNS Firewall management - v2.x
Get the status of the current DNS Firewall status
http://server:port/dnsfw/status
Proxy service management
This section allows you to manage configuration of the proxy.
Turn off the global Emergency
http://server:port/emergency_remove (1.x, v2.x)
http://server:port/proxy/general/emergency/remove (v2.x)If the proxy turn into many issues, Artica will turn the proxy to Global Emergency in order to let users surf on the Web without any filtering rules and authentication.
This action return back the proxy to the normal mode.
Get all metrics:
http://server:port/proxy/metrics/info
Get the status of the authentication method in the proxy.
http://server:port/proxy/auth/statusThis status return true or false if the proxy is correctly linked to any authentication method.
Reconfigure the proxy to use the authentication method.
http://server:port/proxy/auth/reconfigureThe operation rebuild proxy settings in order to use the defined authentication method.
Reconfigure all proxy parameters
http://server:port/proxy/general/reconfigureLaunch the operation to reconfigure all proxy settings.
Reset all configuration and rebuild configuration
http://server:port/proxy/general/resetThis operation reset any configuration applied to the proxy and rebuild proxy with defined configuration in the Artica Web console.
Check if Listen ports are available (REST API v2.20.1 or HotFix v20240201-16)
http://server:port/proxy/ports/checkThe purpose of this operation is to connect to ports currently in production and check that they are listening correctly.
Others
Network management
Get the list of local interfaces
http://server:port/system/network/interfaces (v2.x)
Control / Configure the Artica server - v 1.145/1.189
Enable the shell feature
The REST API is able to receive a zip package and execute a shell script.
This feature must be enabled using ;
/etc/init.d/artica-ad-rest configure shell on|off|yes|no|1|0
For security reason, you need to set a password that allow Artica to execute the shell script.
/etc/init.d/artica-ad-rest configure shellpass [password]
Once configured, create a shell script named shell.sh
Artica use some macros SCRIPT_ID and SHELL_PASS
in this example, we want to patch Artica without using a Service Pack.
Please take care on the file format (Unix with only \n carriage return not \r\n)
#!/bin/sh
# Artica will put the shell script in a temporary directory, get the current directory.
CURDIR=`/bin/pwd`
# the defined shell password.
SHELL_PASS="shellpassword"
# Define a script ID in order to get its status and events with the API.
# Can be letters or numeric.
SCRIPT_ID="6654568"
# we replace some files in the Artica directory.
echo "Copy $CURDIR/ressources/class.ftp.client.inc to Artica directory"
cp -fd $CURDIR/ressources/class.ftp.client.inc /usr/share/artica-postfix/ressources/class.ftp.client.inc
if [ ! -f /usr/share/artica-postfix/ressources/class.ftp.client.inc ]; then
exit 1
fi
exit 0
compress the shell script and associated files in zip format:
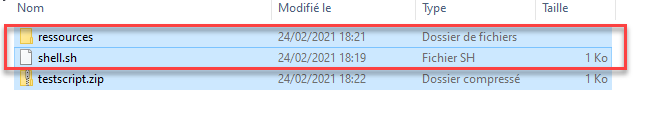
Upload the package to the API using:
curl -F "zipcontainer=@/home/testscript.zip" http://server:port/shell_upload
Using an upstream proxy for the Artica Client - v1.189
This API allows you to define if the Artica Client must use a proxy in order to download maintenance packages or any retrievals features trough Internet.
Enable using an upstream proxy
http://server:port/configuration/proxy/enable/192.168.1.1:3128
Disable using an upstream proxy
http://server:port/configuration/proxy/disable
Display current configuration
http://server:port/configuration/proxy
Software Install/upgrade/info - v1.141 - v1.145
The API allows you to install or upgrade any supported software managed by Artica.
Retrieve the Artica version ( v1.145 / 2.x )
http://server:port/artica_version
produce a json with following information:
{
"status": true,
"major": "4.30.000000",
"version": "Artica version 4.30.000000 Service Pack 110",
"service_pack": "110"
"latest_upgrade": . . .
}
The “latest_upgrade” key data display events of the last uploaded Service Pack using the API.
Upgrade Artica with an HotFix (v2.x)
http://server:port/system/artica/hostfix
You need to POST the file using the key hotfix as filename:
curl -X POST -F "hotfix=@/home/Patchs/20230825-19.tgz" https://server:port/system/artica/hotfix
Upgrade Artica with a Service Pack (v1.145)
http://server:port/softwares/service_pack
You need to POST the file using the key servicepack as filename:
curl -F "servicepack=@/home/Patchs/ArticaP141.tgz" http://server:port/service_pack
The status report only the correct uploaded file, once the Service Pack is uploaded, Artica will perform the upgrade operation in background mode.
To verify the correct upgrade, refer to the artica_version API to get latest_upgrade info and Service Pack version.
Patch the Artica server with your own patch. (v1.145)
Reproduce the structure of the /usr/share/artica-postfix directory and compress it with zip
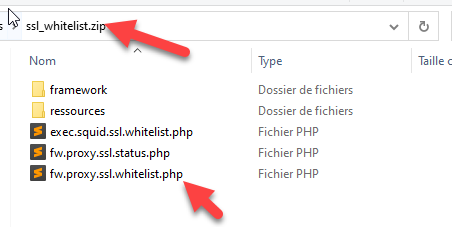
You need to POST the file using the key servicepack as filename:
curl -F "servicepack=@/home/Patchs/mypatch.zip" http://server:port/service_pack
Update the REST engine ( version 1.189 )
After the version 1.189 you can send order to update the REST engine to any version.
Notice: If you downgrade the REST engine to version before 1.189, you will not able to use update feature.
Refresh the index file
First you need the engine to retrieve the index file on the Artica Tech repositories.
http://server:port/autoupdate/refresh
Will force the engine to download and store the available versions from the cloud.
It produce this json :
{
"status": true,
"info": "Update index refreshed",
"index": {
"1189": {
"VERSION": "1.189",
"URI": "http://articatech.net/download/artica-monit-active-directory-1.189.tar.gz",
"MD5": "de4e74ddad5d06d71334208a1c4d6e9a"
},
"1210": {
"VERSION": "1.210",
"URI": "http://articatech.net/download/artica-monit-active-directory-1.210.tar.gz",
"MD5": "36d2ef6aed77b26e21fce8aa93506113"
},
"1139": {
"VERSION": "1.139",
"URI": "http://articatech.net/download/artica-monit-active-directory-1.139.tar.gz",
"MD5": "b72ada467db792f9c80b8f2b4824934b"
},
"1157": {
"VERSION": "1.157",
"URI": "http://articatech.net/download/artica-monit-active-directory-1.157.tar.gz",
"MD5": "2e2c7a681255a7f17260da3fcbeacf20"
},
"1151": {
"VERSION": "1.151",
"URI": "http://articatech.net/download/artica-monit-active-directory-1.151.tar.gz",
"MD5": "e3909544b944c9f8a418f1ebaa5dc9b5"
}
}
}
The most import information is the key in integer mode, it will be used to send the update command order.
For example, if we want to update to 1.210 version, we will use the 1210 key
Get the index
This command send the same information of the refresh order, the only difference is the engine did not try to download the index file from the cloud repository.
http://server:port/autoupdate/index
Update version
Once you have choose which version you want to update, use the integer key found using the refresh or index order.
http://server:port/autoupdate/update/[integer key]
This command order the service to download the package and update the current version.
In this case, the command http://server:port/autoupdate/update/1201 will order the service to be updated on 1.201 version.
REST API
Each REST command return in many cases an 200 HTTP Code expect for FATAL errors that return a 404/500 error.
The result of query/order is defined by the “status” token, if the status token return false, this means the query or the order was failed to be processed.
Retrieve Active Directory status:
http://server:port/status
return a json :
{
"status": true,
"current_daemon": "19",
"info": "The Active Directory Connection seems OK",
"avg_service_time": "45004 msec",
"requests_sent": "2589",
"max_daemons": "20",
"queue_length": "0",
"replies_received": "2589"
}
status: true or false. if status is false, this means your Active Directory connection is broken and the info token explain why there is a failed result.
current_daemon: The number of active proxy authentication daemons
max_daemons: The number of maximum proxy authentication allowed for the proxy.*
requests_sent: The number of Active Directory authentication queries.
queue_length: The number of requests saved in queue ( if you have a some queued requests, this means your Active Directory server take time to answer)
replies_received: The number of answers from the Active Directory ( in most cases it must be the same of requests_sent)
info: Event of the request.