This page shows how to install the Windows agent by hand on one workstation.
Then it shows how to import the certificate of the appliance, enrol the workstation and connect it to the NAS.
To deploy many workstations at once with a Group Policy, see Windows agent.
¶ Before you start
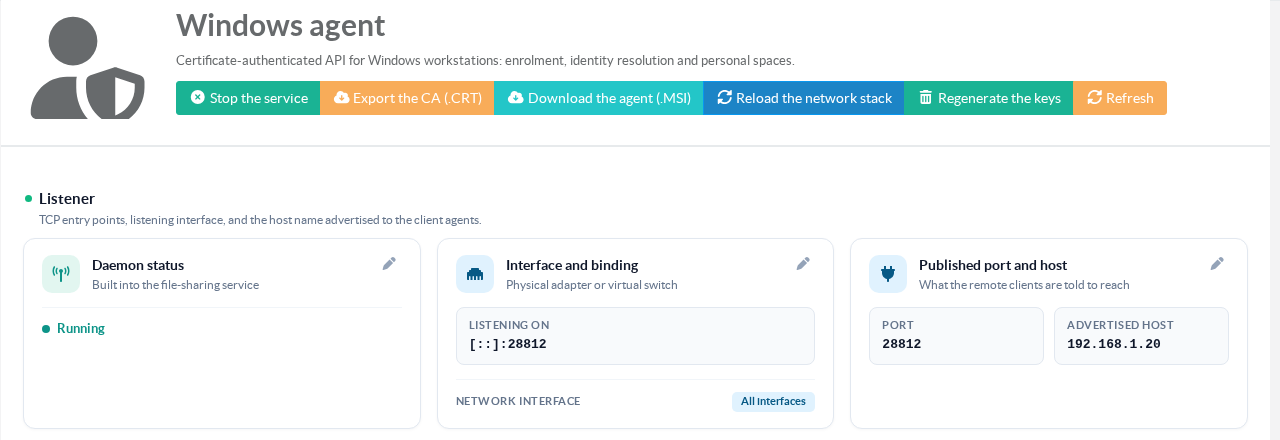
- The Windows agent service must be running on the appliance.
OpenFiles Sharing › Windows agentand check that Daemon status shows Running.
If it does not, click Start the service. - Check the Advertised host.
It is the name or address the workstations will reach. - The workstation must reach the appliance on TCP port 28812.
Open this port on any firewall between them. - You need an administrator account on the workstation.
It is asked twice: to install the agent and to import the certificate. - The agent must be version 1.1.99 or later.
Older versions do not have the Import the certificate… menu.
¶ 1. Install the agent
On the Windows agent page, click Download the agent (.MSI).
Copy the file to the workstation.
Double-click ArticaSambaClient.msi and follow the installer.
Windows asks for an administrator account.
[david: the installer window of ArticaSambaClient.msi]
You can also install it from an administrator command prompt:
msiexec /i ArticaSambaClient.msi /qn /norestart /l*v C:\Windows\Temp\artica-agent.logAlways keep /norestart.
Without it, a silent installation may restart the computer on its own.
At the end of the installation, the Artica icon appears in the notification area.
You do not need to log off.
If you do not see it, click the arrow that shows the hidden icons.
[david: the Artica icon in the notification area, just after the installation]
¶ 2. Export the certificate of the appliance
The certificate identifies your appliance.
Once imported, the workstation trusts this appliance and no other.
On the Windows agent page, click Export the CA (.CRT).
The browser downloads a .crt file.
Copy this file to a local folder of the workstation, for example C:\Users\Public.
Do not leave it on a network drive or in OneDrive.
The administrator account that imports it may not see these places.
¶ 3. Import the certificate
Right-click the Artica icon.
Choose Import the certificate…
[david: the icon menu with « Import the certificate… »]
Select the .crt file you copied.
The window only shows .crt, .cer and .pem files.
[david: the file selection window]
A confirmation shows the name of the authority and its fingerprint.
Compare the fingerprint with the CA fingerprint shown on the Windows agent page of the console.
They must be the same.
[david: the confirmation « Pin this workstation to authority … (fingerprint …)? »]
Click OK.
Windows asks for an administrator account (UAC).
A standard user types the name and password of an administrator.
[david: the UAC window]
The icon then shows « This workstation is pinned to authority … You can now enroll it. »
The Import the certificate… entry disappears from the menu.
[david: the success message]
An administrator can do the same from a command prompt run as administrator:
"C:\Program Files\ArticaSamba\artica-samba-client.exe" pin-ca --ca-file C:\Users\Public\artica-ca.crt¶ 4. Enrol the workstation
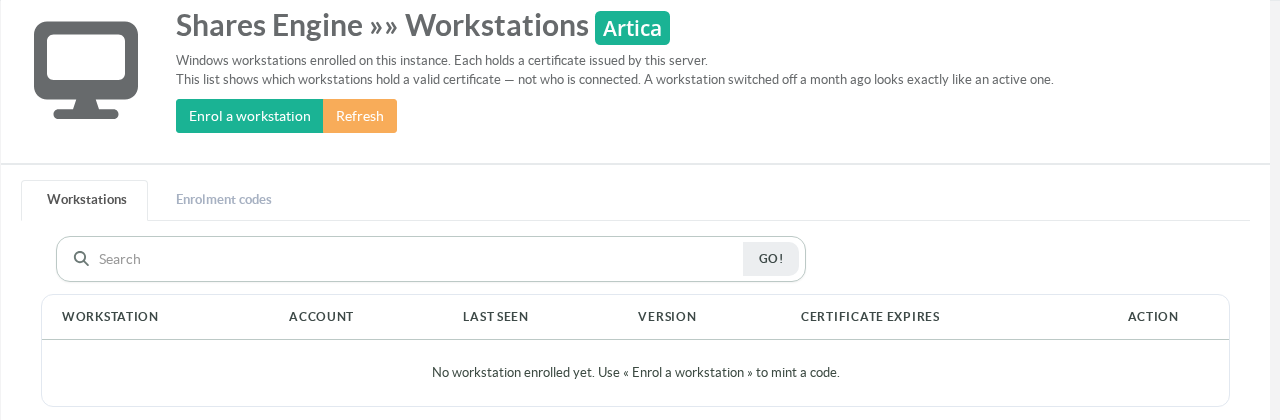
In the console, open the instance and its Workstations page.
The path is Files Sharing › Instances › your instance › Workstations.
Click Enrol a workstation.
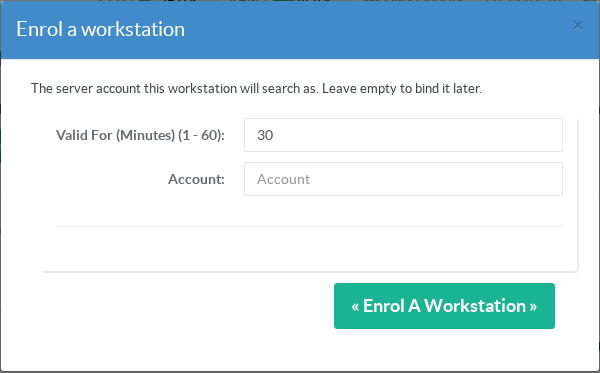
Choose how long the code stays valid.
Optionally, type the server account the workstation will search as.
Click Enrol A Workstation.
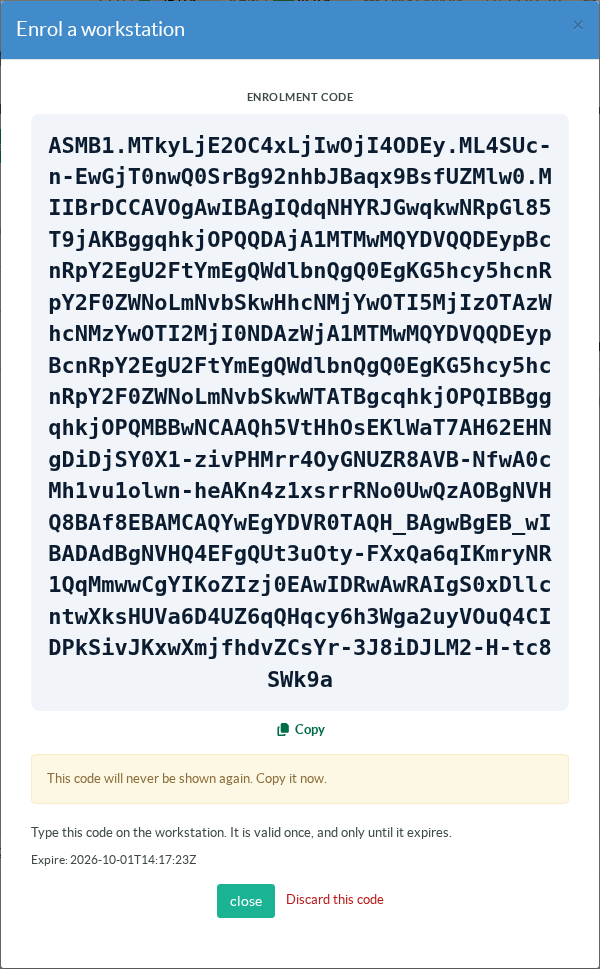
The console shows the enrolment code once.
Click Copy.
The code is valid for one workstation, and only until it expires.
On the workstation, right-click the Artica icon.
Choose Enroll this workstation… and paste the code.
An administrator account is not needed: the certificate imported at step 3 is enough.
[david: the window where the enrolment code is pasted]
The icon shows « This workstation is enrolled. »
The workstation now appears in the Workstations list of the console.
[david: the message « This workstation is enrolled. »]
¶ 5. Connect to the NAS
Right-click the Artica icon.
Choose Connect.
[david: the icon menu with « Connect »]
The first time, the icon may ask for the password of your account on the appliance.
It is asked once, then kept in your Windows credential store.
[david: the password window]
Your personal drive is mounted, as U: by default.
The administrator can choose another letter for the instance.
Choose Open the drive to open it in Explorer.
[david: Explorer showing the personal drive]
¶ Troubleshooting
- The icon does not show « Import the certificate… »
The workstation is already pinned, for example by theSERVERandCA_FINGERPRINTproperties of the MSI.
Nothing needs to be imported.
The entry also stays hidden when the icon cannot reach the Artica Samba service of the workstation. - « The administrator account could not read this file again, or it changed »
The file is on a network drive, in OneDrive, or it was replaced.
Copy it to a local folder such asC:\Users\Publicand try again. - « This workstation is already pinned »
To pin the workstation to another appliance, reinstall the agent with theSERVERandCA_FINGERPRINTproperties. - The enrolment code is refused
The code expired, was already used, or comes from another appliance than the imported certificate.
Mint a new code in the console. - The workstation cannot reach the appliance
Check that the service is Running, that port 28812 is open, and that the Advertised host resolves from the workstation.
- Windows agent
Service, listener, MSI and Group Policy deployment, enrolment codes and Windows identities. - Windows agents
Concept, features, benefits and use cases. - Artica File Server Appliance
Back to the feature overview.