Artica Failover Service
Failover service is used to create high-availability solutions, and was designed to be simple but powerful.
Overview
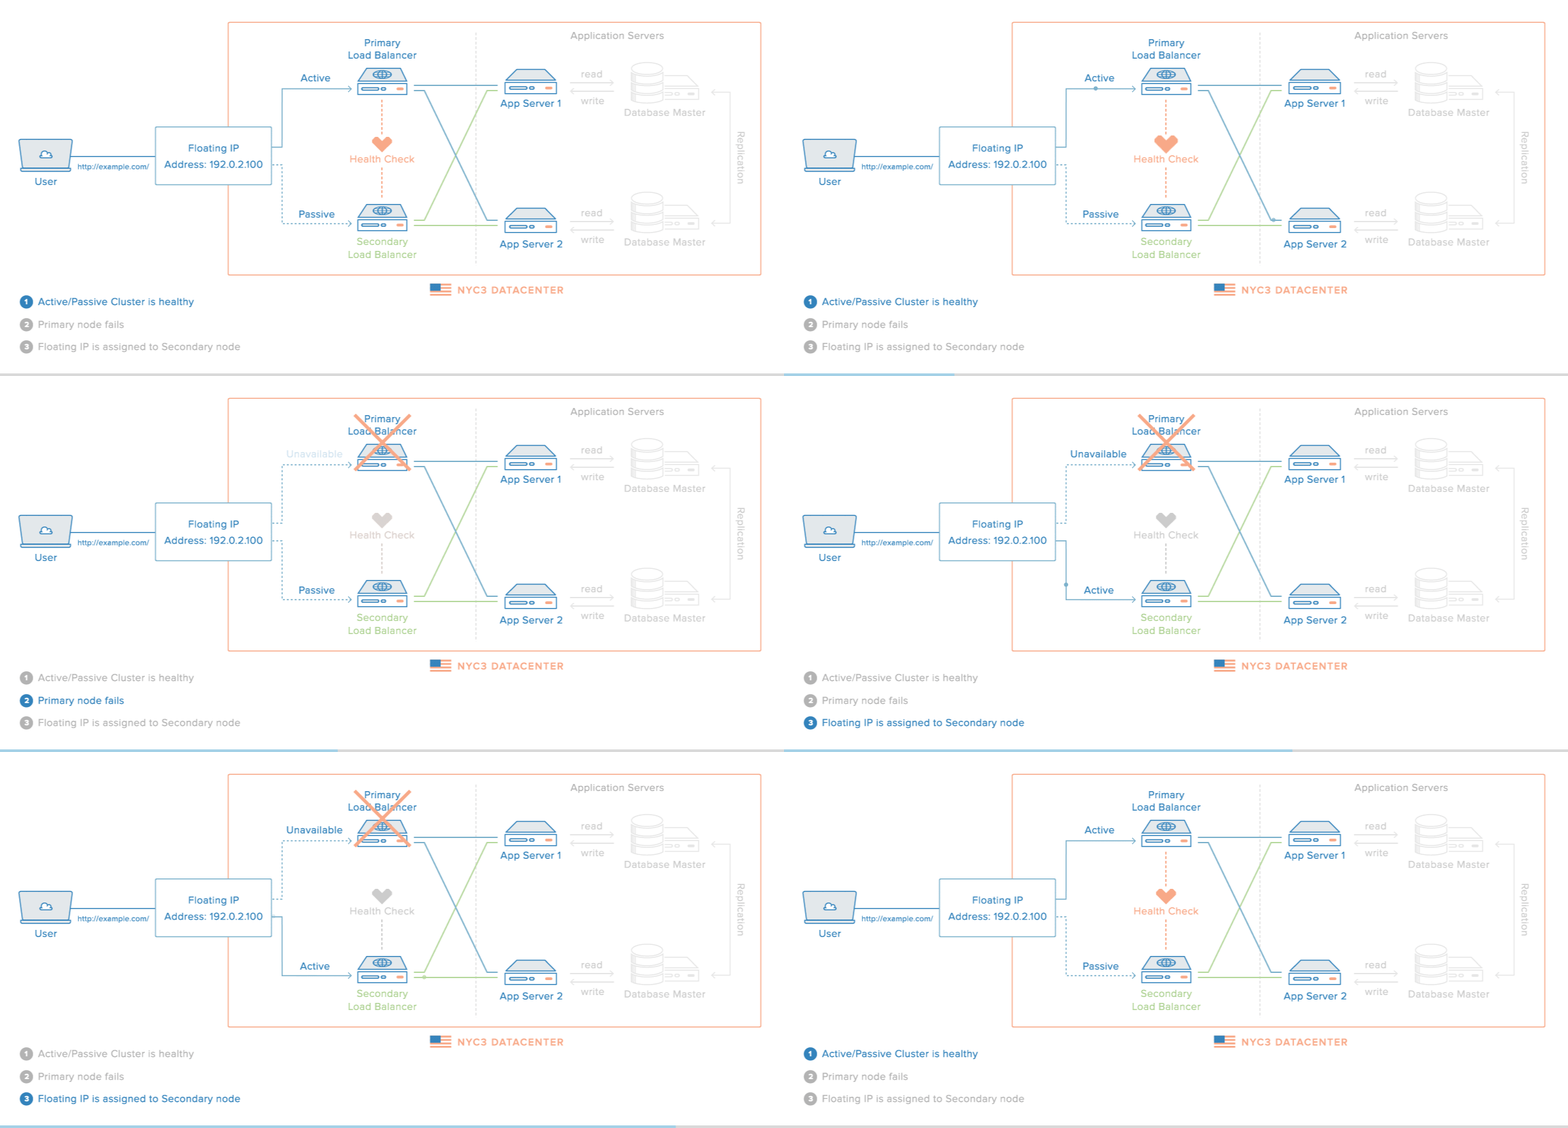
Artica Failover Service is based on Keepalived software and is used for high-availability services between two or more nodes. It worked on VRRP (Virtual Router Redundancy Protocol) protocol.
The Failover service performs health checks to the selected services and if detects any failure it will automatically move the Floating IP to the next node with higher priority without any lost of communication to end user.
 |
|---|
| Image Credits - digitalocean.com |
Artica Failover Service is in alpha stage and is avaliable since Service Pack 319.
Installation and configuration of the Failover service is done only on the Artica server that you assign as the primary node (master).
Installation
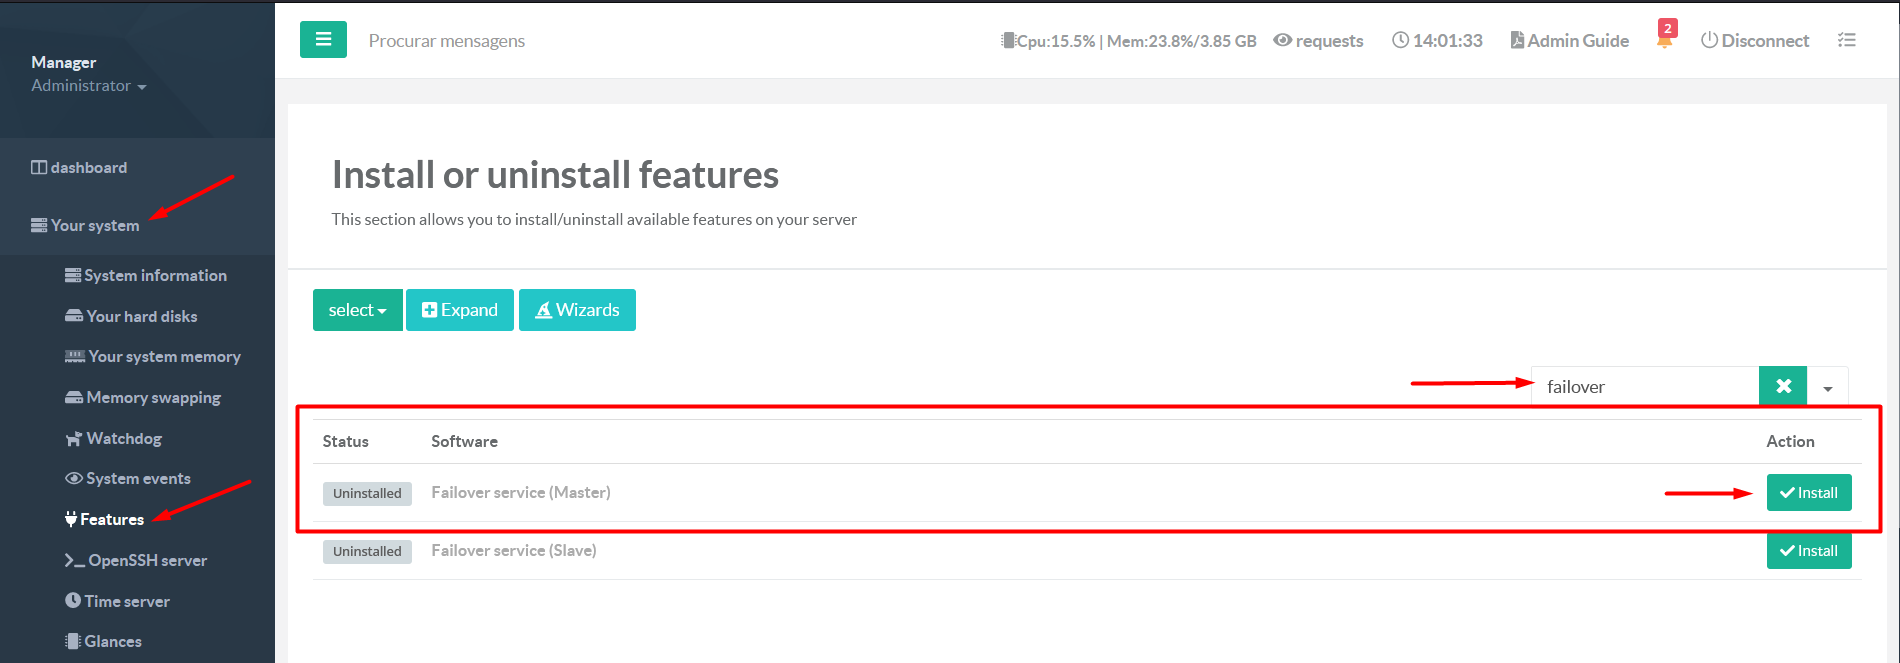
On Artica Server that you assign to be the primary node (Master), go to:
- Your system
- Features
- Search for "Failover service (Master)"
- Click on button "Install"
Parameters
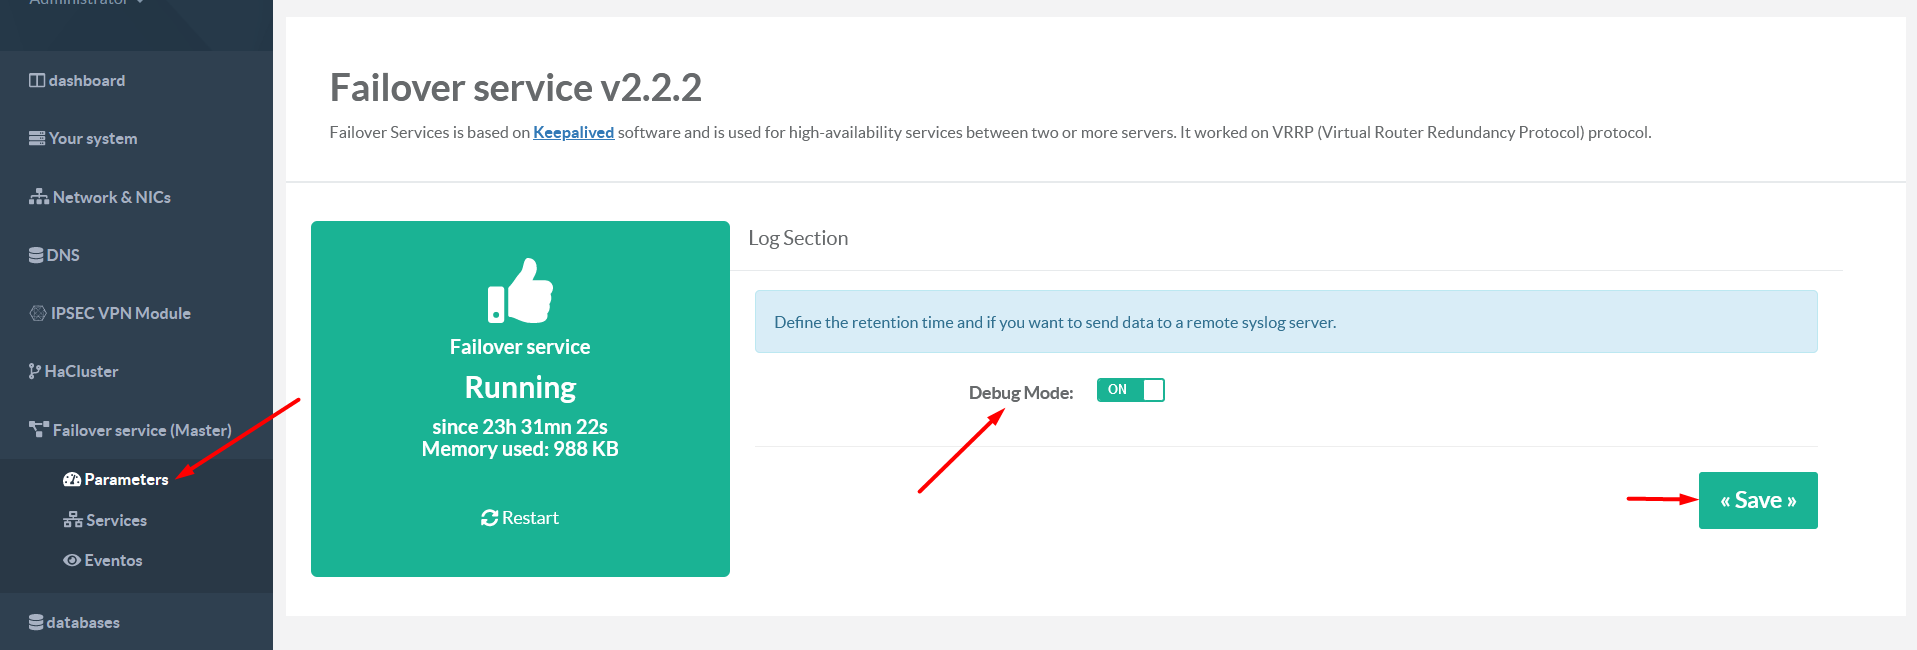
This section displays the satus of the Failover service and allow to disable the Debug Mode in case of some failure.
When you enable the Debug Mode, this mode will be enable in all the nodes of the service.
Create HA Service
To create a Failover services, go to:
- Failover service (Master)
- Services
- Click on the button "New Failover Service" to open the wizard
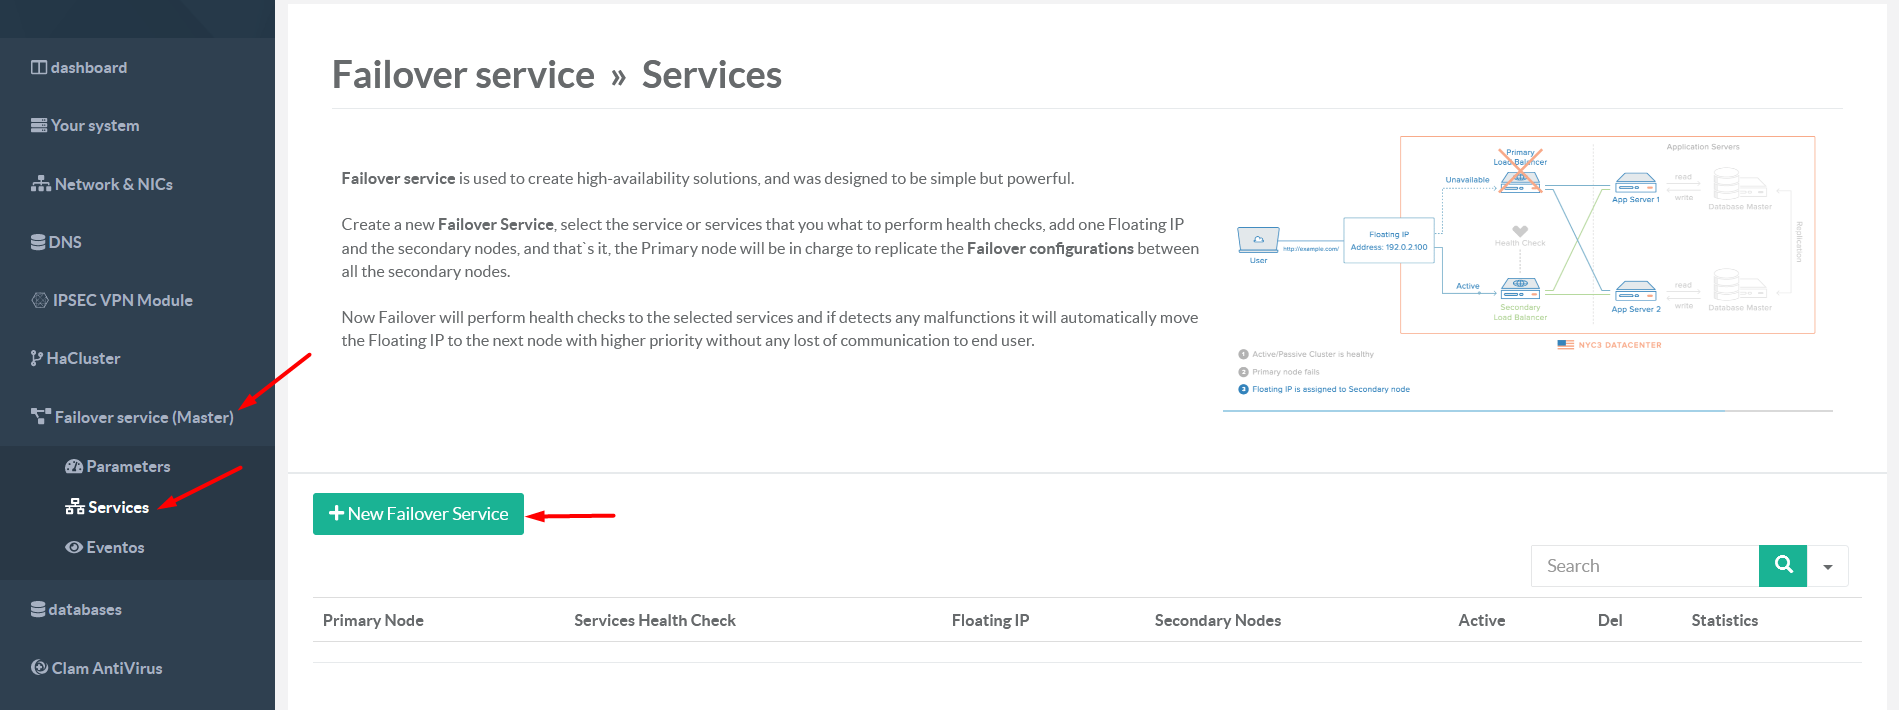
The Wizard
The wizard will guide you step by step to help you to create the service in just 3 steps, more options will be available after you create the service.
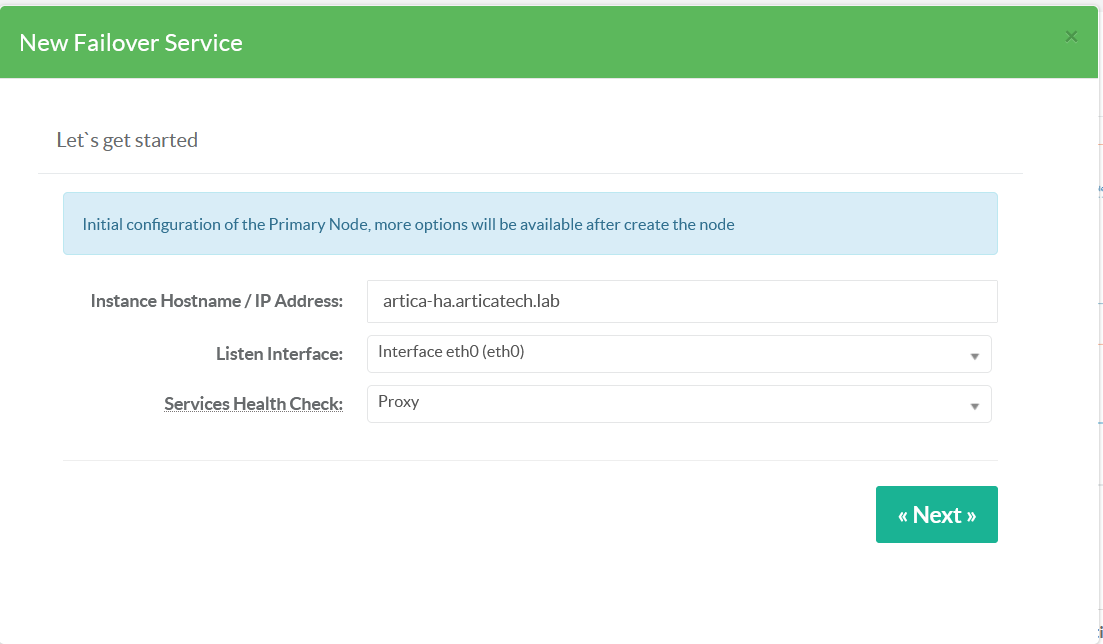
Step 1 - Primary node information
- Hostname / IP - This is the hostname / ip address of primary node, by default Artica fill it with the hostname.
- Listen Interface - The network interface that the service will listen.
- Services Health Check - The service that the Failover deamon will perform health checks.
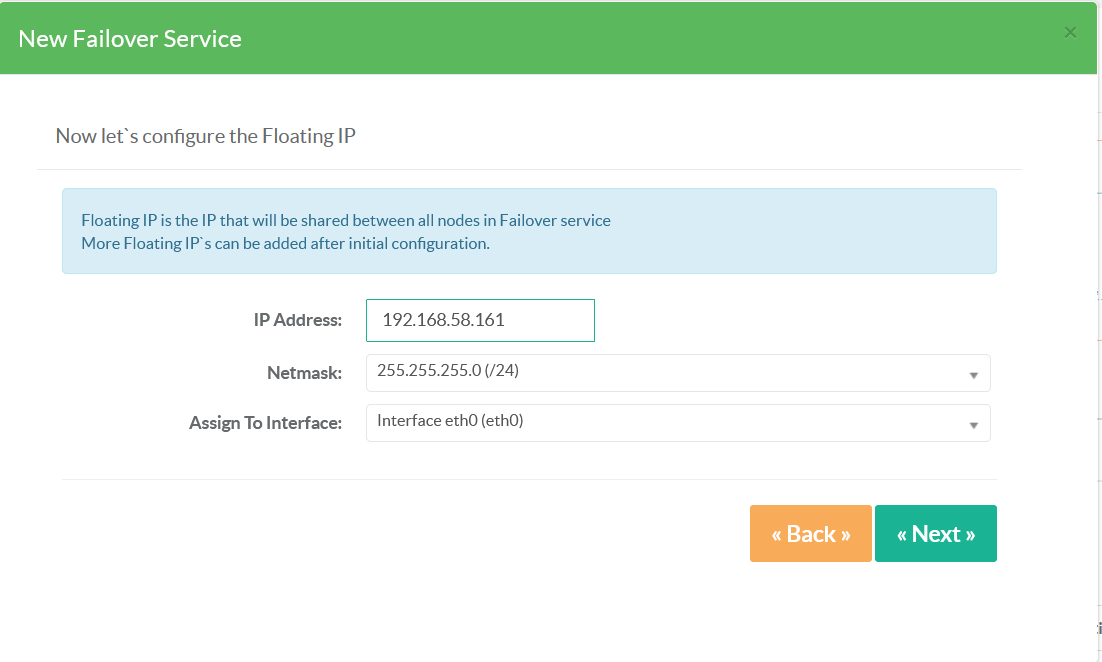
Step 2 - Floating IP
- IP Address - The IP address for the floating IP.
- Netmask - The network netmask of the floating IP.
- Assign to Interface - The network interface that the floating IP is assigned.
Step 3 - Secondary nodes (Slaves)
- IP Address - The IP address of Artica secondary node
- Remote Artica listent port - The port of Artica Console of secondary node.
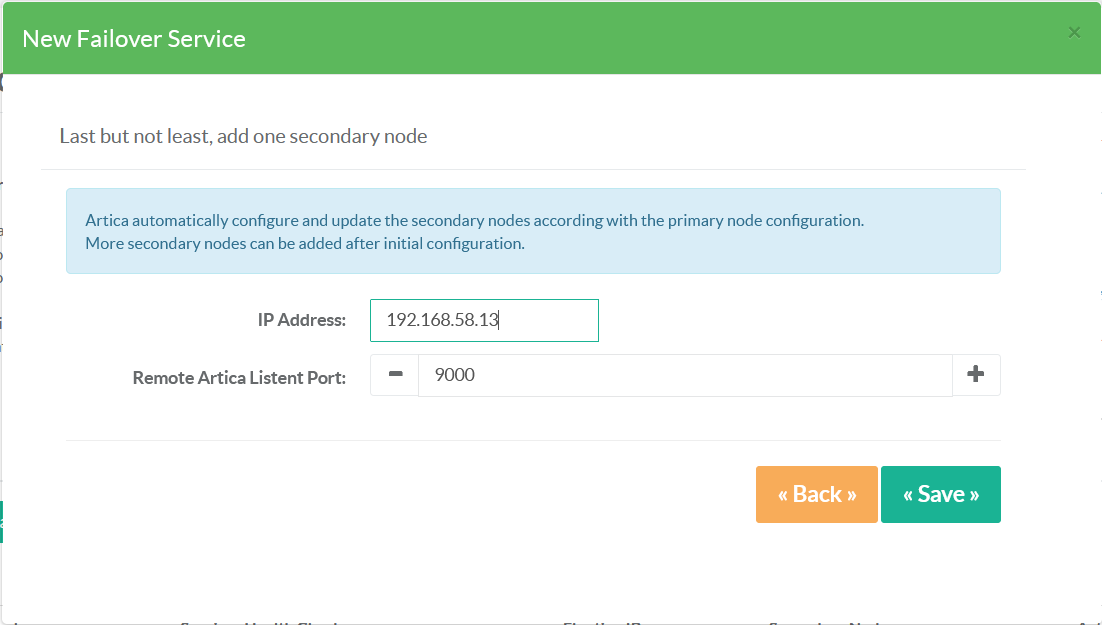
Click Save to build the service, the Primary node will be in charge to install and configure the Failover Service in all Secondary nodes.
The only action that you have do is change the listen interface / ip to ALL or to the Floating IP in each service that you are performing health check. This must be done in every node.
Service Status
After the service is created, you can see in main table, the status of each node.
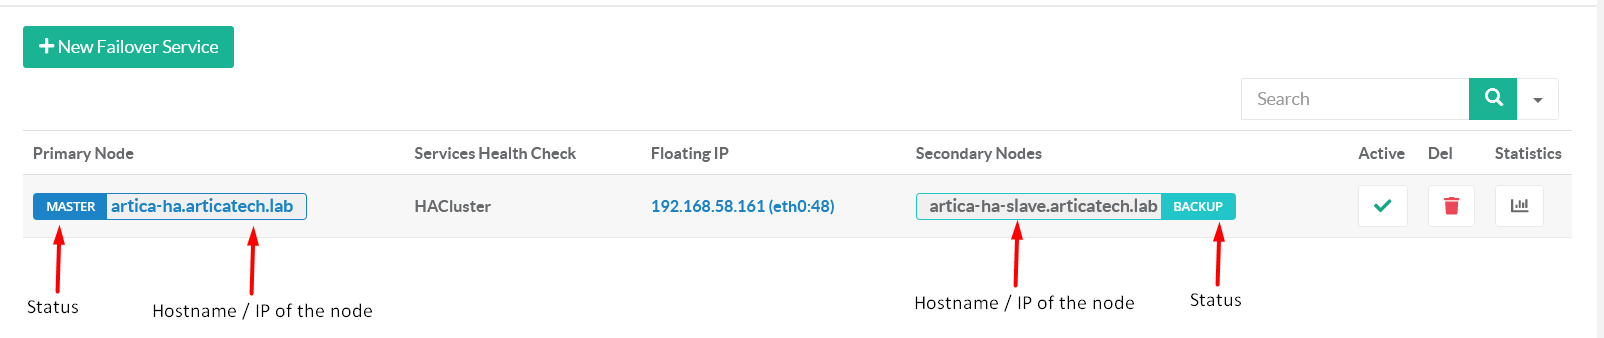
The status can be:
- MASTER - By default the node who owns the MASTER rule is the primary node, but if any failure occurs in primary node, the MASTER rule is transferred to the next secondary node with higher priority. The MASTER state is marked with the color Blue.

- BACKUP - BACKUP means that the nodes are UP and in Passive mode. The BACKUP state is marked with the color Light Blue

- FAULT or {SERVICE} IS DOWN - This means that the node is in FAULT state due a failure of a {SERVICE}. The FAULT state is marked with the color RED

- WAITING REGISTRATION / CONFIRMATION" - Means the the node is in SYNC proccess, this procces is market with the color ORANGE

Unless all nodes are of Fault state, the Floating IP always have the Blue color of the node who owns the MASTER rule, so you can easily see where the traffic goes to.
Edit HA Service
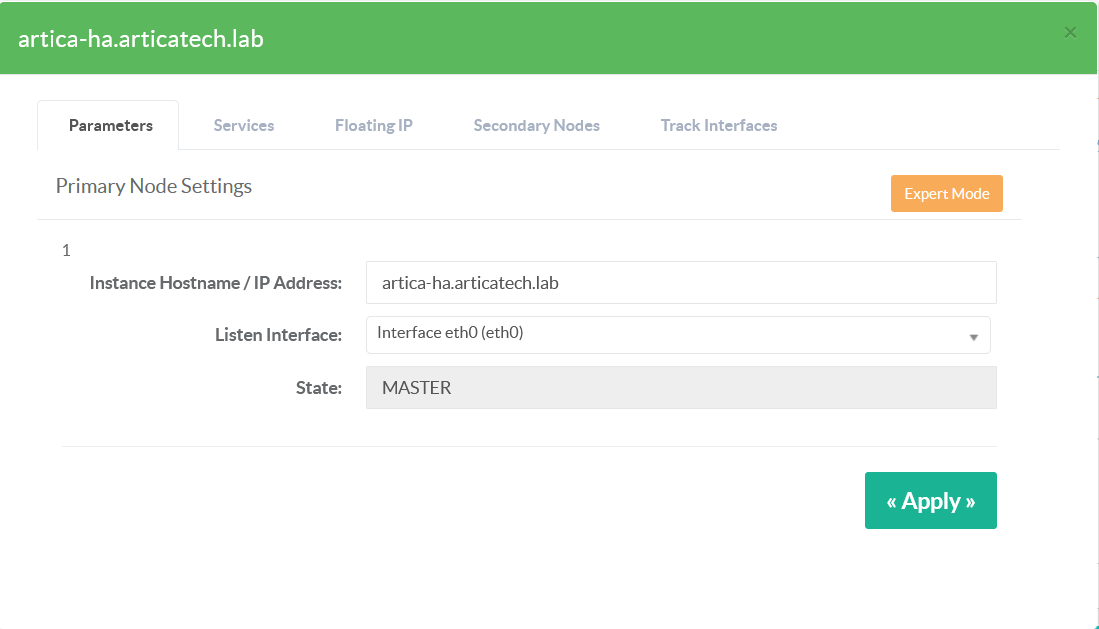
Click on the primary node name to access to the service settings.

Parameters
Parametes tab contains the mais settings of the service.
- Instance hostname / IP Address - Hostname / IP of primary node.
- Lister Interface - The network interface that the service will listen.
- STATE - The initial state of primary node.
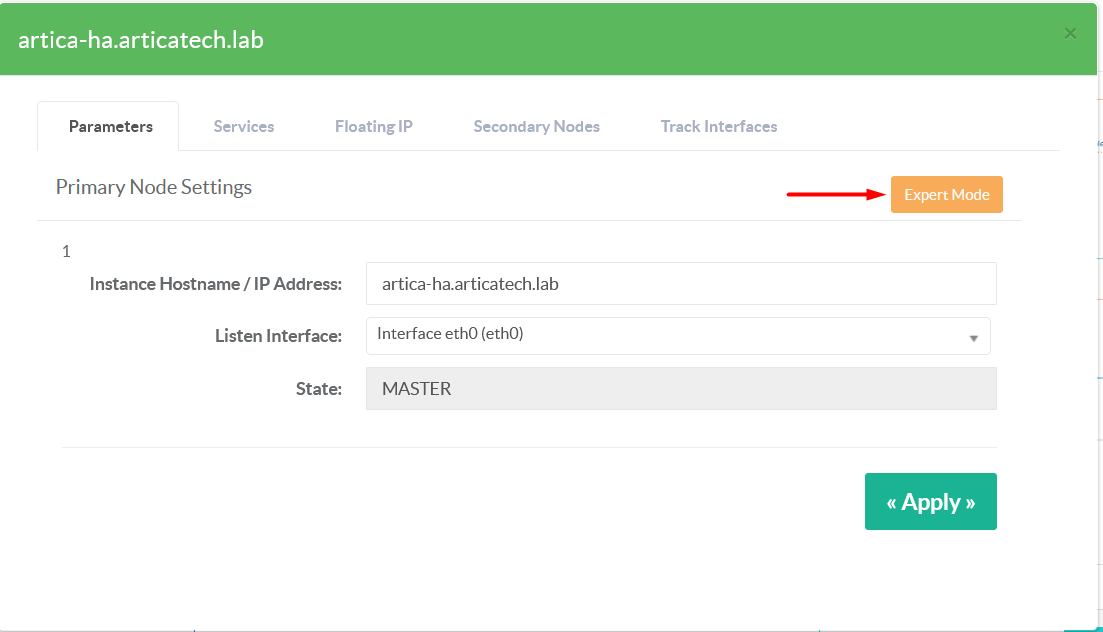
Expert Mode
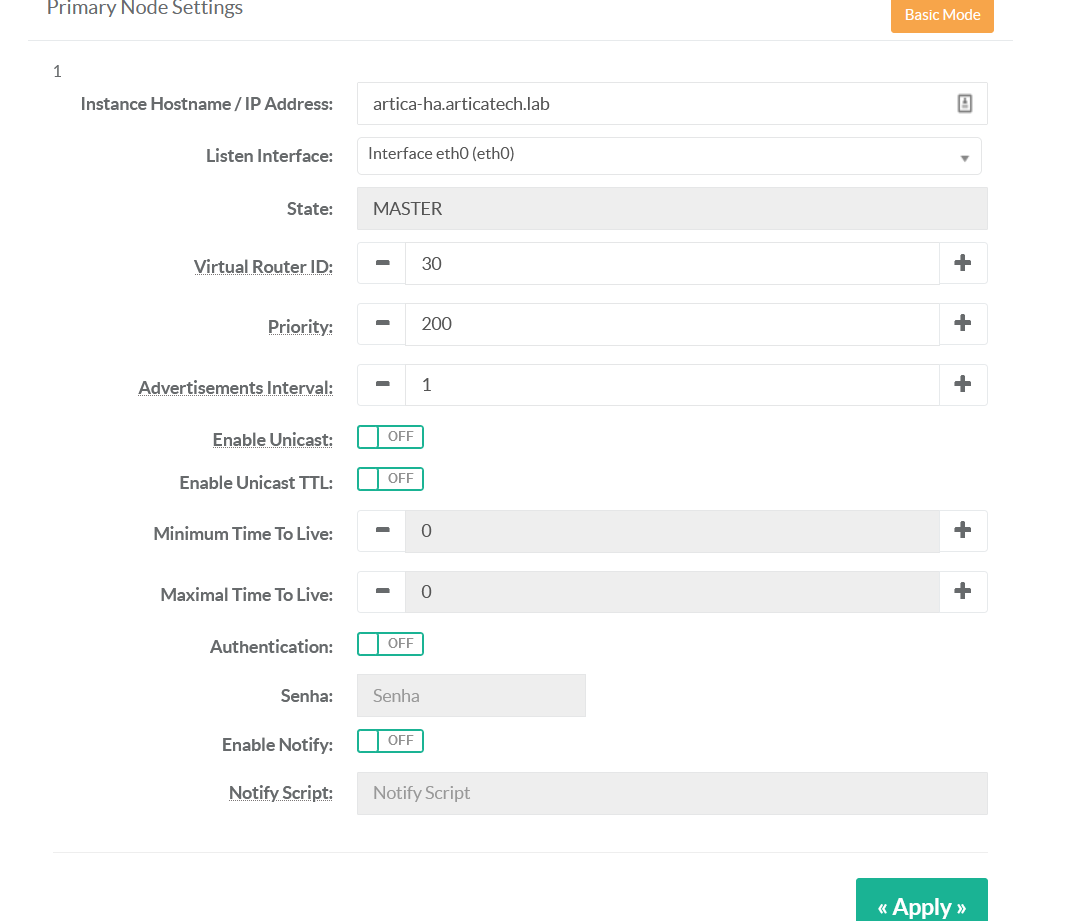
The Expert Mode give you access to advanced settings.
- Virtual Router ID - Numeric number (1-255) of the route that will be used by all nodes in the service, the Router ID must be the same in all nodes.
- Priority - Priority of the nodes, the Primary Node must always have higher priority than secondary nodes.
- Keep Floating IP AKA nopreempt - Allows the lower priority machine to maintain the master role, even when a higher priority machine comes back online.
- Advertisements interval - Interval in seconds that the Failover services will send advertisements broadcast to nodes in the service.
- Enable Unicast - By default Failover sends the advertisements through Multicast, if you environment does not support Multicast, enable the Unicast.
- Enable Unicast TTL - Enable this options if you want to enable TTL in unicast.
Be careful with this option, bad TTL values can stop the advertisements broadcast, causing the malfunction of the Failover service.
- Minimum Time to live - Minimum TTL value between 0-255.
- Maximal time to live - Maximal TTL value between 0-255.
- Enable Authentication - Enable this option if you want to use authentication.
- Password - Type the password for authentication.
The authentication use the PASS method.
- Enable Notify - Enable this option if you want to use your own notify script (Not recommended)
- Notify Script - The path of your script.
Services
The service tabs contains the service or services that the Failover will perform health checks.
We continue to improve this section in order to support more checks for all the core services.
Avaliable Health Checks
| Services / Checks | Service Running | Emergency Modes | Connectivity Tests | DNS Resolution |
|---|---|---|---|---|
| Proxy | x | x | x | |
| SMTP | x | |||
| HA Proxy | x | |||
| HA Cluster | x | |||
| Unbound DNS | x | x | ||
| Power DNS | x | x | ||
| DNS Firewall | x | x | ||
| DNS Cache | x | x |
Example
We have two Proxy servers in our company and we want to create HA Failover service between them, to do this:
- Click on the button New Service
- Select the Proxy service
- Normally Proxy is linked to DNS Server, so click again on the button New Service and select the DNS Service installed on your server
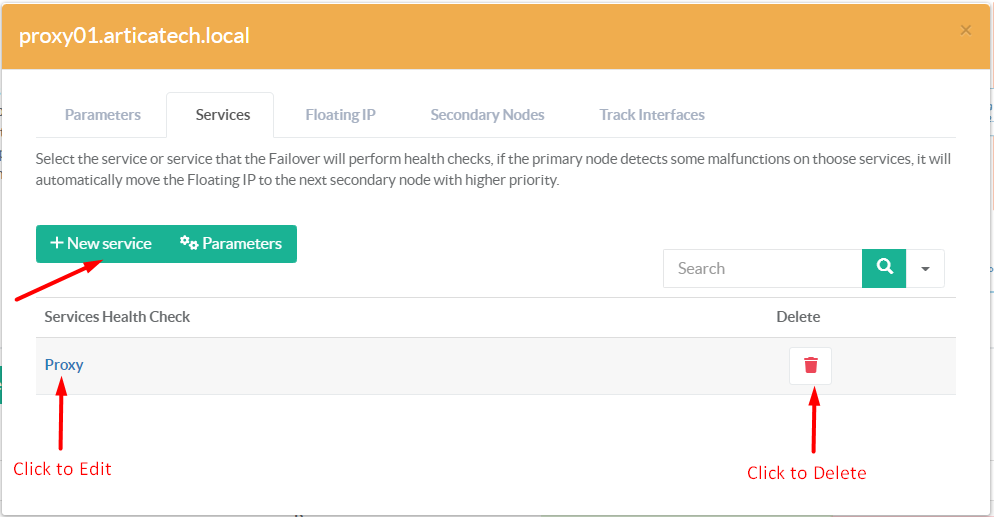
Important note: If you select Proxy service to be checked, you must set the Timeout to at least 10 in Parameters section.
Service Parameters
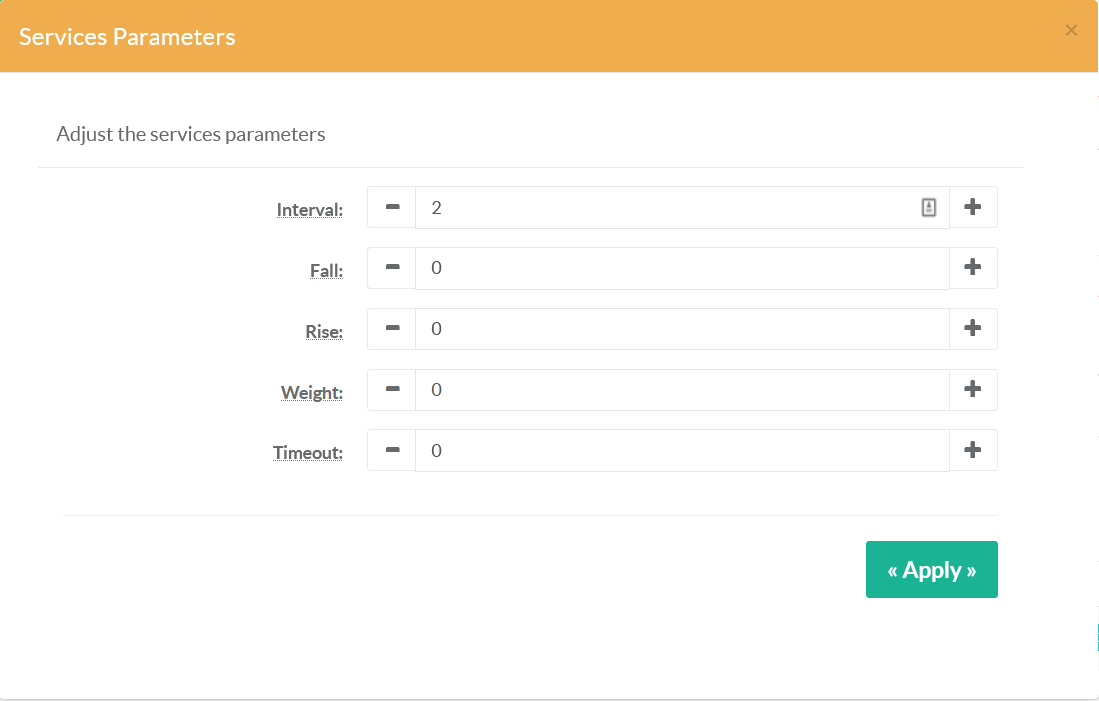
Click on parameters button adjust the health check settings
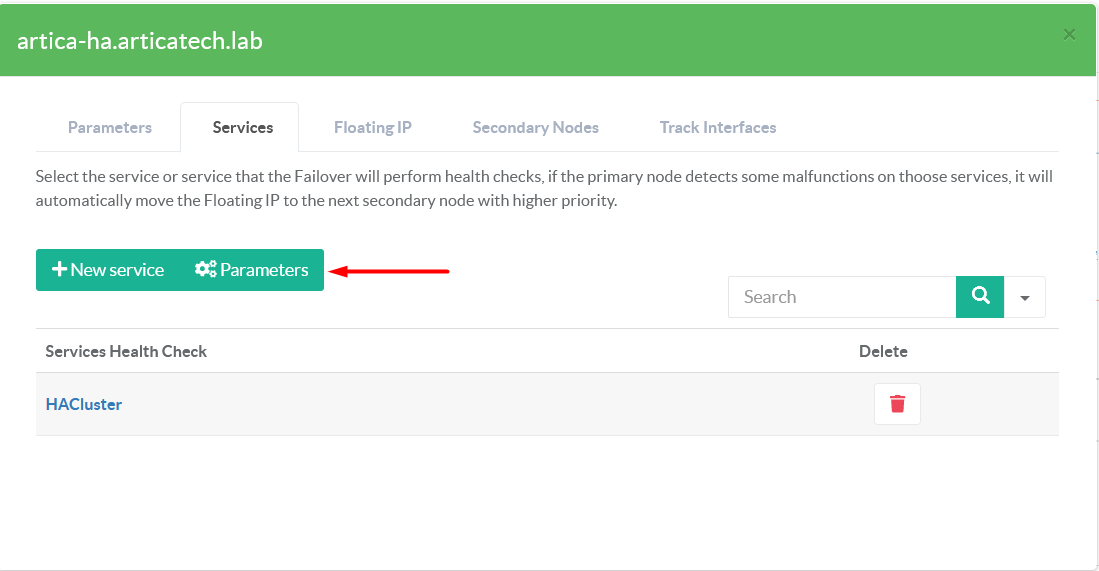
- Interval - How often the health check should be run (seconds), eg: every 2 seconds.
Set 0 if you don't want to use Interval. - Fall - How many times the health check return unsuccessfully (or time out) in order for the host to be considered "unhealthy."
Set 0 if you don't want to use Fall. - Rise - How many times the health check must return successfully in order for the node to be considered "healthy."
Set 0 if you don't want to use Rise. - Weight - Adjust priority by weight, eg: If you set Priority of the node is 100 and you set the weight to 5 the service will asume the Priority of the node as 105 (100+5) as long as the service is UP. If the service goes down, then the priority will drop down to 100 and trigger a failover.
Set 0 if you don't want to use Weight. - Timeout - How long to wait for the health check to return (seconds)
Set 0 if you don't want to use Timeout.
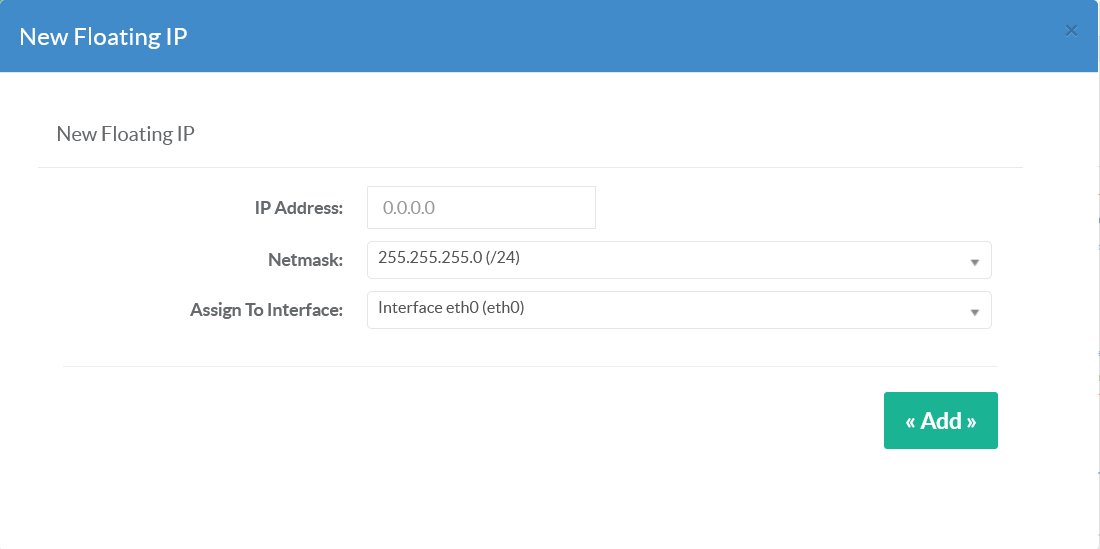
Floating IP
The Floating IP tab contains all the information of the Floating IP's used by the service
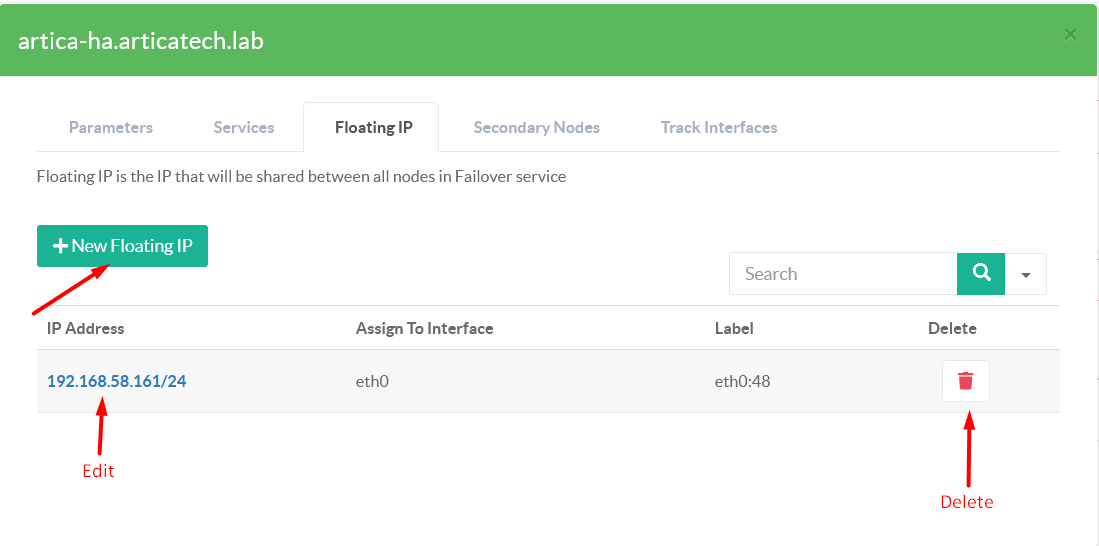
- IP Address - The IP address for the floating IP.
- Netmask - The network netmask of the floating IP.
- Assign to Interface - The network interface that the floating IP is assigned.
Secondary Nodes
The Secondary Nodes tab lists the settings and the status of all available nodes.
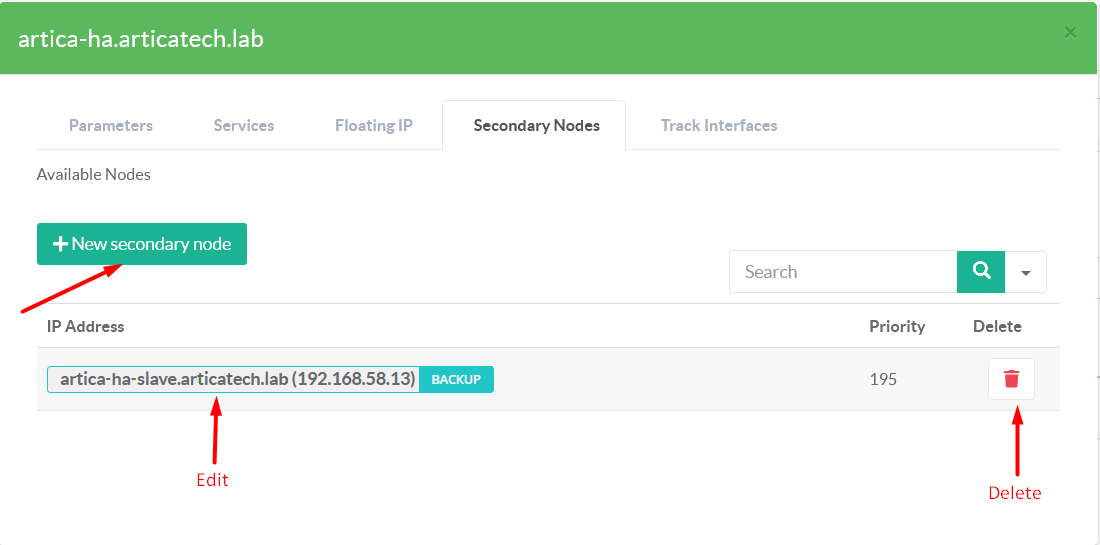
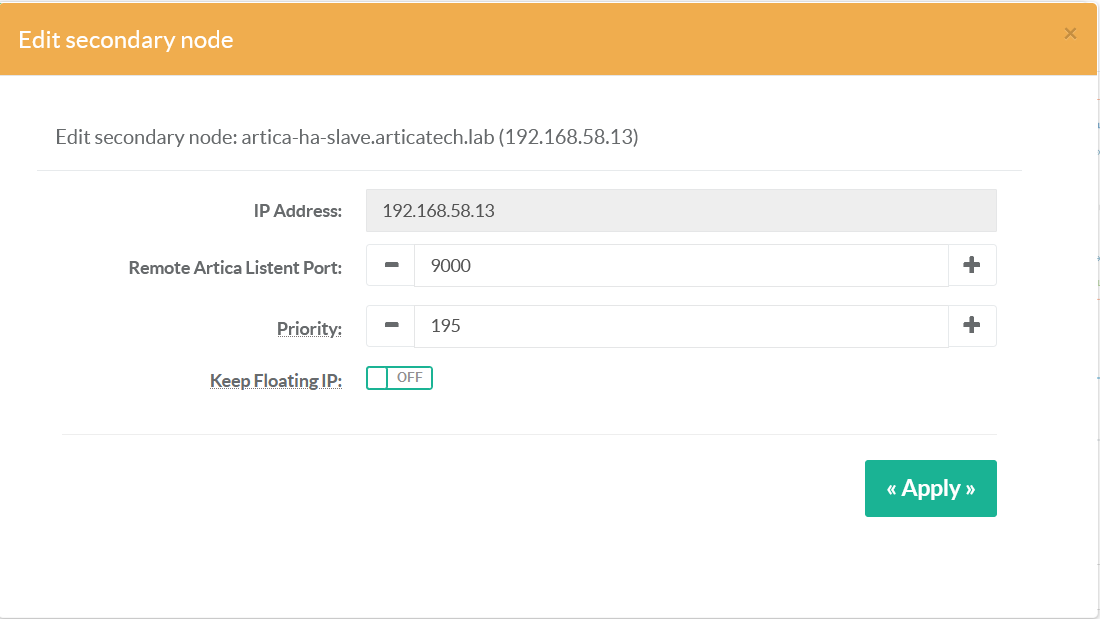
- IP Address - The IP address of Artica secondary node
- Remote Artica listent port - The port of Artica Console of secondary node.
- Priority - Priority of the node, the Secondary node must always have lower priority than Primary node.
- Keep Floating IP - When the Primary node fails the Floating IP will be moved to the secondary node with higher priority, by default when the Primary node node resume connection the Floating IP is transferred again to the Primary node.
If the option Keep Floating IP AKA nopreempt is enable, the Floating IP will remain on the Secondary node that become "Master".
Track Intefaces
Use Track Interfaces if you want a node to enter in FAULT state if one or more interfaces goes down.
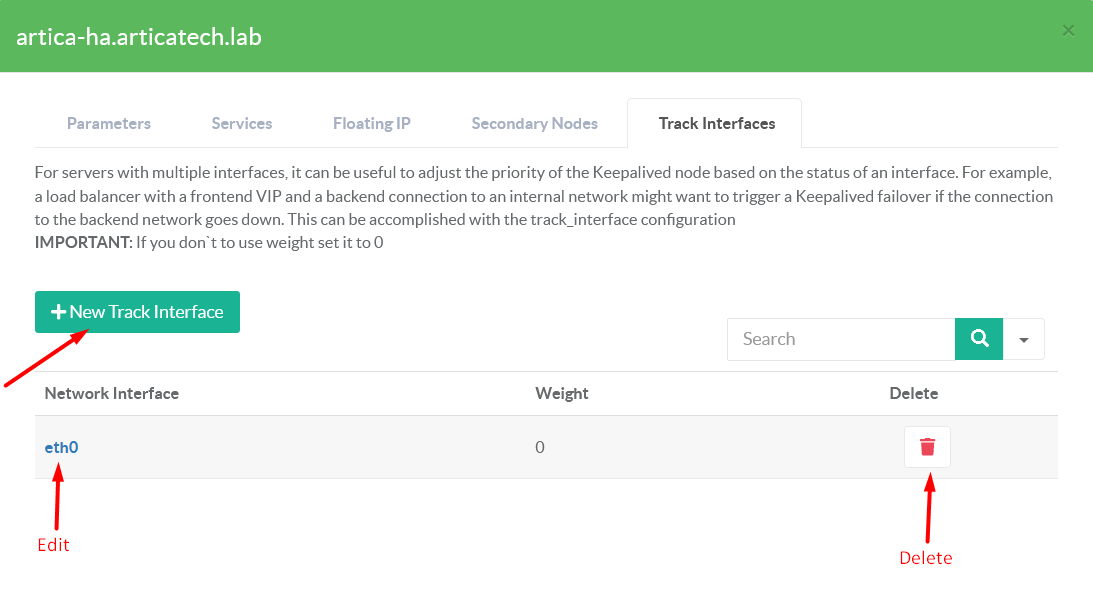
- Local interface - Select the interface that you want to track
- Weight - Adjust priority by weight, eg: If you set Priority of the node is 100 and you set the weight to 5 the service will asume the Priority of the node as 105 (100+5) as long as the interface is UP. If interface goes down, then the priority will drop down to 100 and trigger a failover.
Set 0 if you don't want to use weight.
Enable / Disable HA Servie
To Enable / Disable a HA service click on button Active on main table. This operation will also Enable / Disable the HA service in all Secondary Slaves

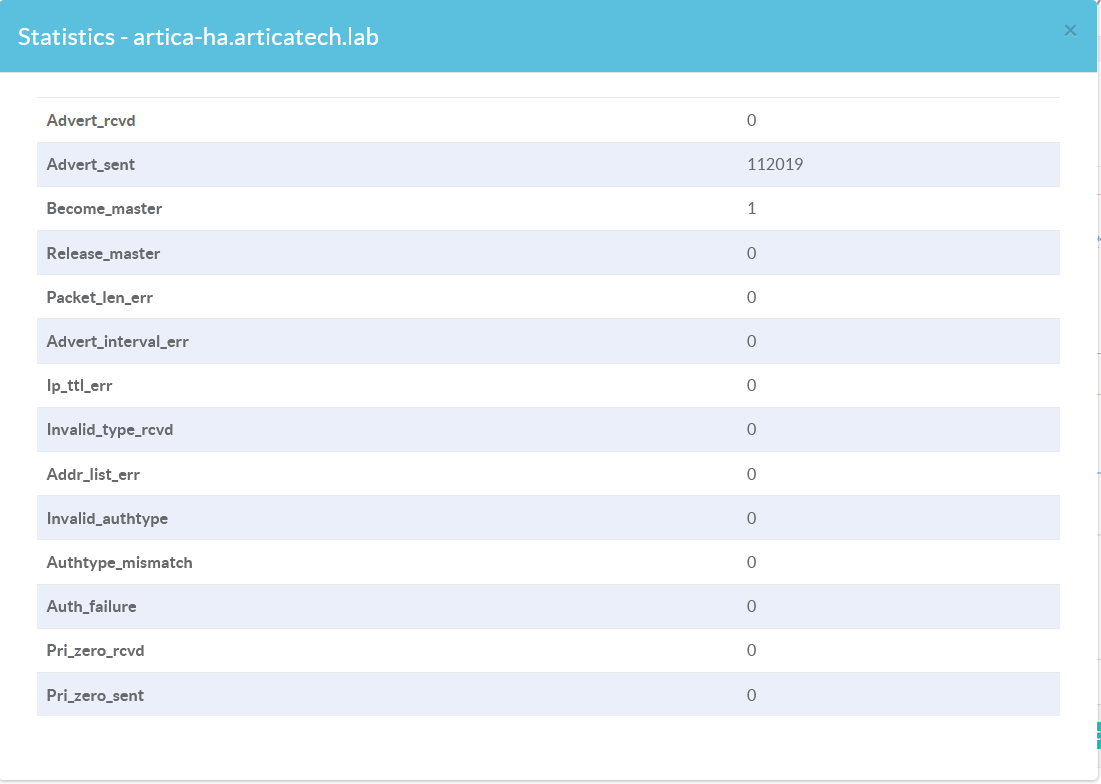
View Statistics
To view the Statistics of the HA service, click on button Statistics on main table.

Delete HA Service
To Delete a HA service click on button Del. on main table. This operation will also Delete the HA service in all Secondary Slaves

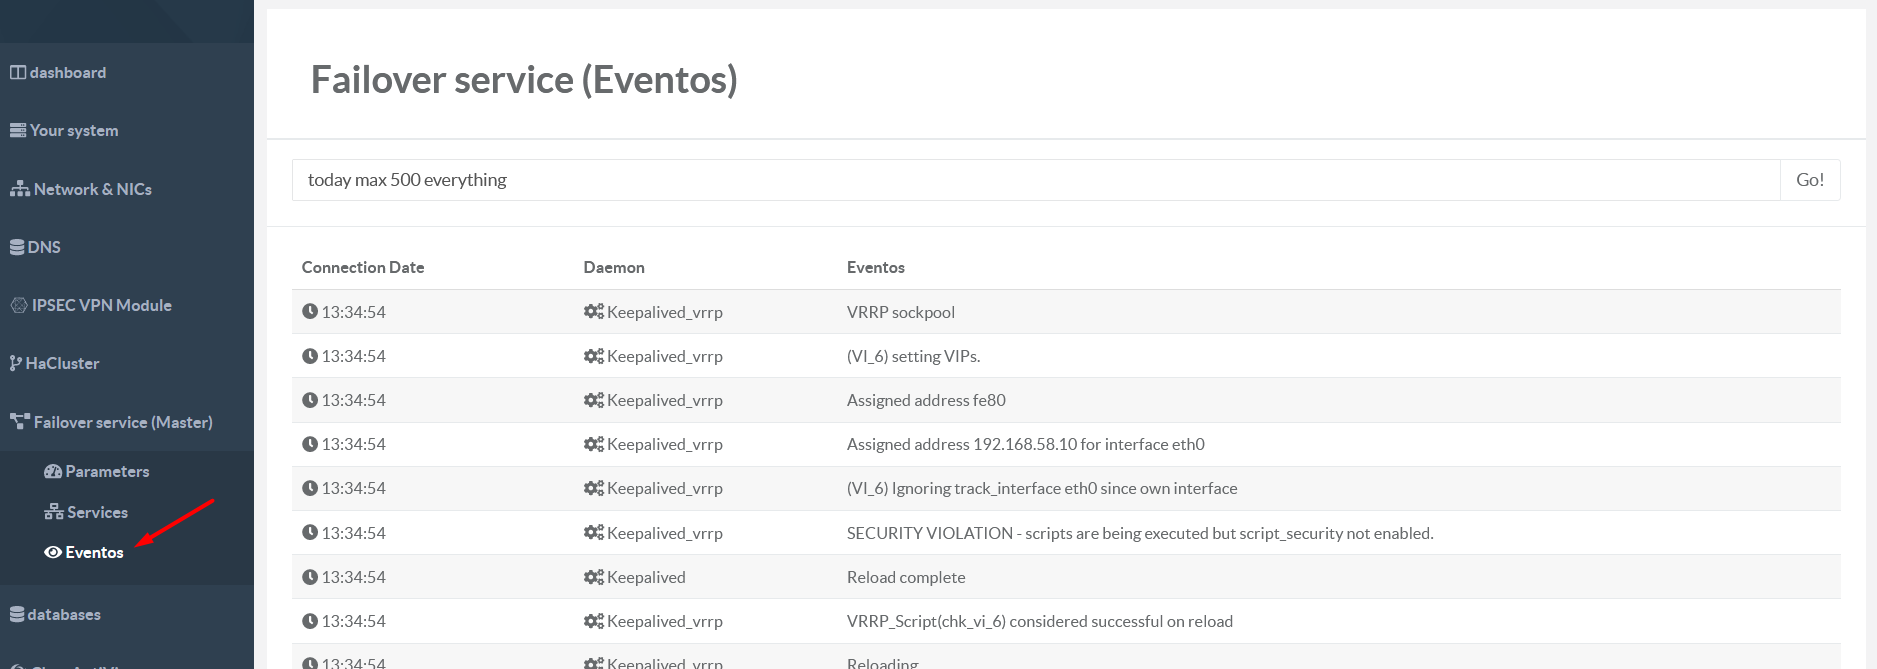
Events
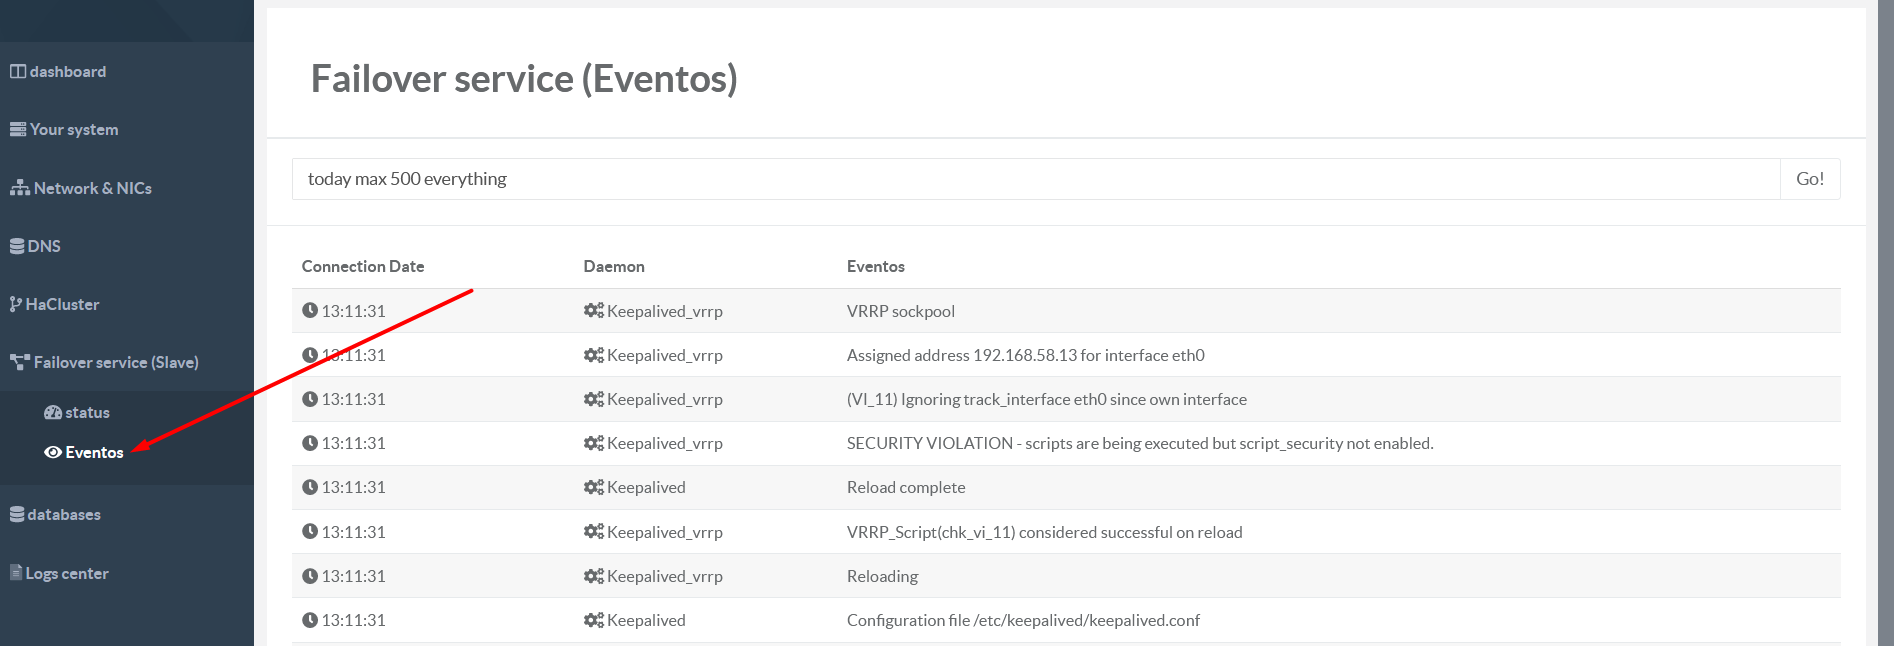
This section displays the events of Failover service
Secondary Nodes Interface
The secondary nodes interface is just accessible from the Secondary nodes and the design is bit different.
No actions are allowed in Secodary Nodes
Status
The Staus interface shows you the information about:
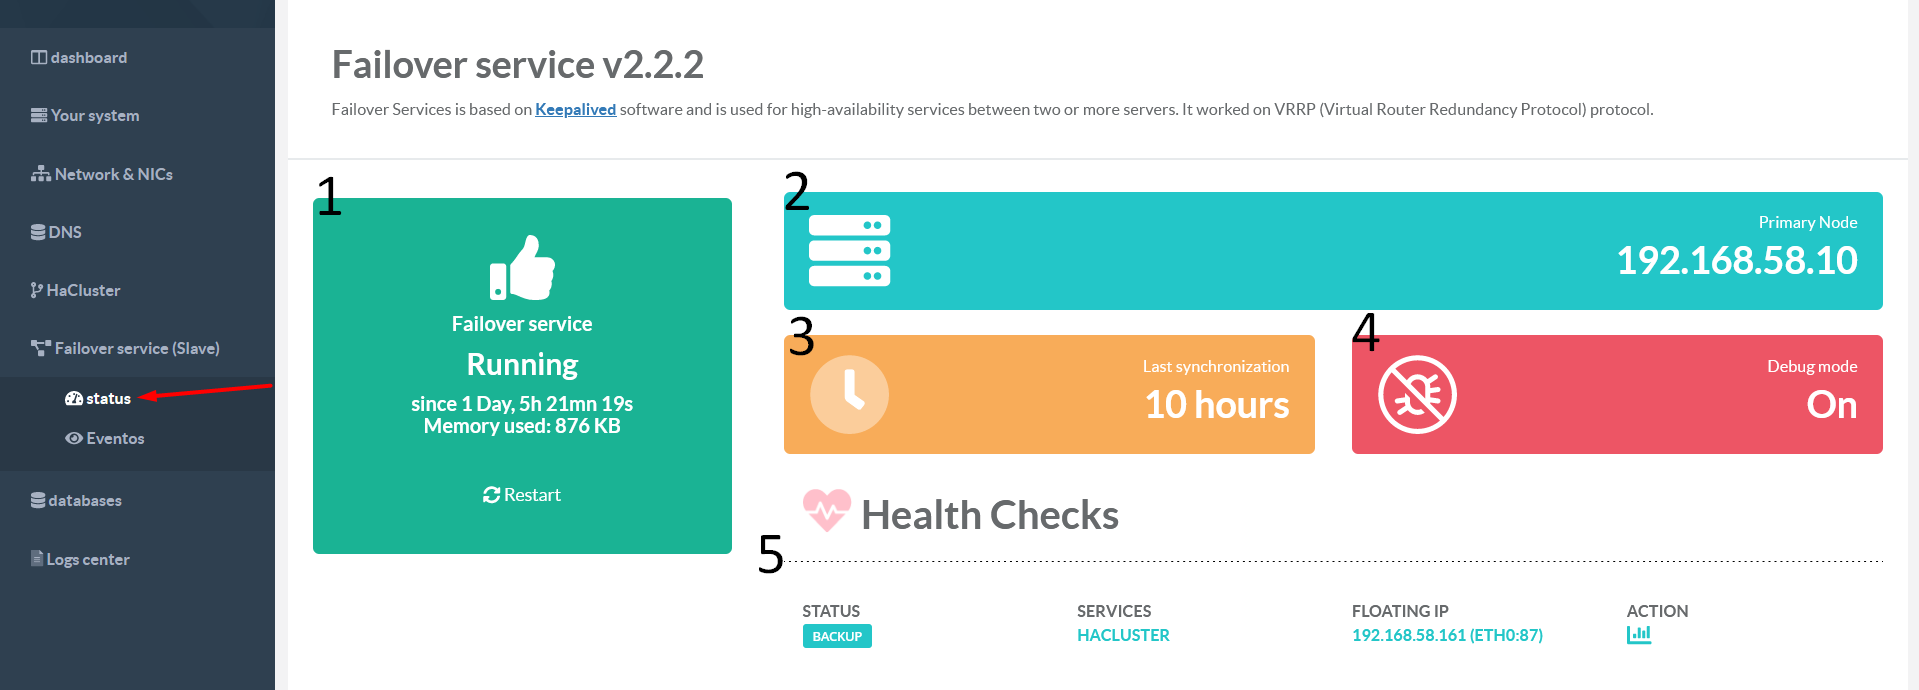
- The status of the Failover service
- Who is the Primary Node
- The Last synchronization between the Primary Node and the Secondary Node
- The Debug Mode status
- The Servie Health Checks and the status of current Secondary Node.
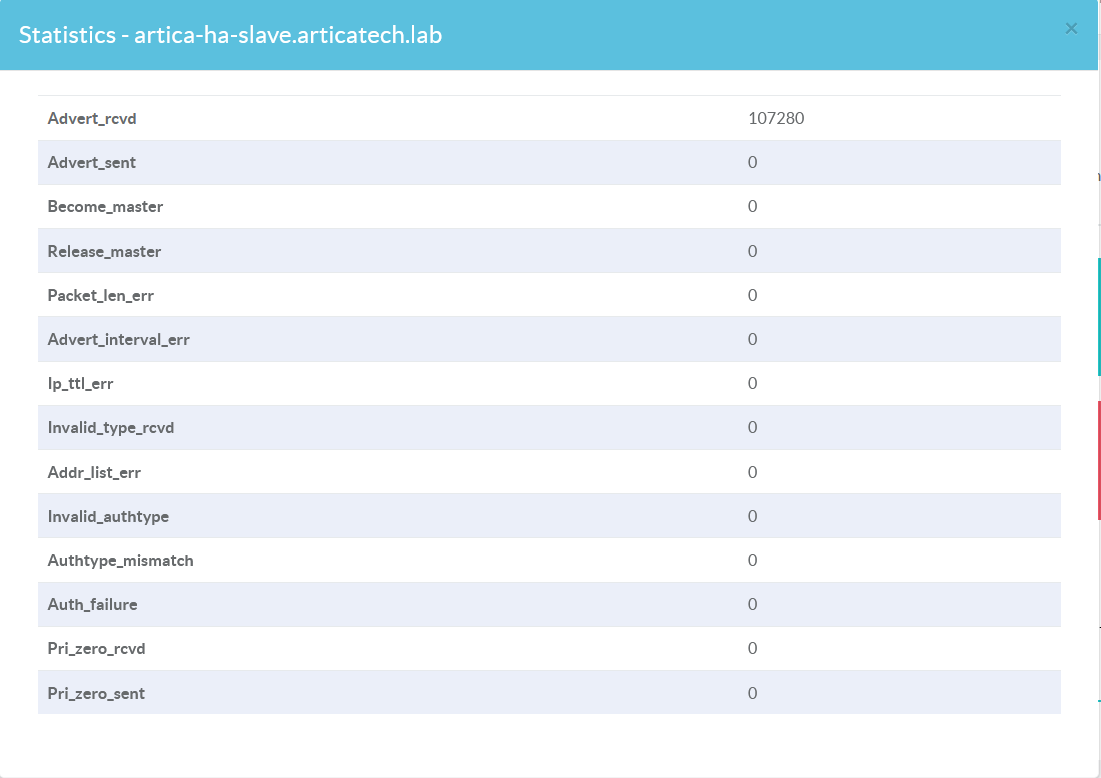
To view the Statistics of the HA service on this node, click on button Statistics

Events
This section displays the events of Failover service
Examples
DNS Cache service in failover mode
Troubleshooting
All nodes are in Fault state even all services are up and running
If you select the Proxy service to be monitor in Healt Check section, please check if the Timeout field is at least 10s in Parameters.
Keep Floating IP AKA nopreempt option not working or is ignored
For this to work, the initial state of all nodes must be BACKUP, so make sure that the option Keep Floating IP is enabled in all nodes.
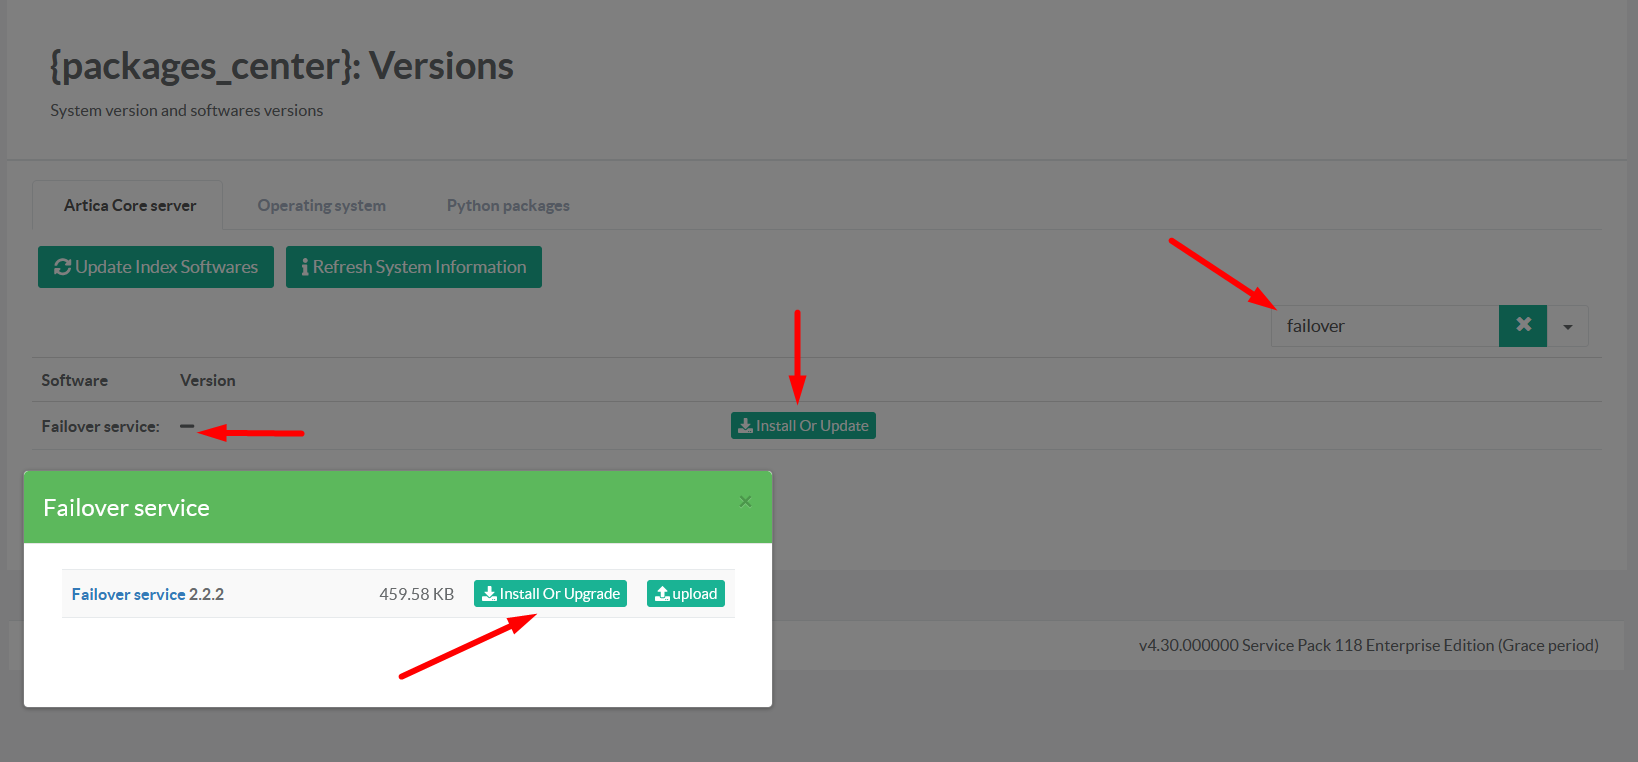
Failover service is not installed
The button says "not installed" when you try install the Faiolver service (Master) or (Slave)
This means that the Keepalived software is not installed in your operating system.
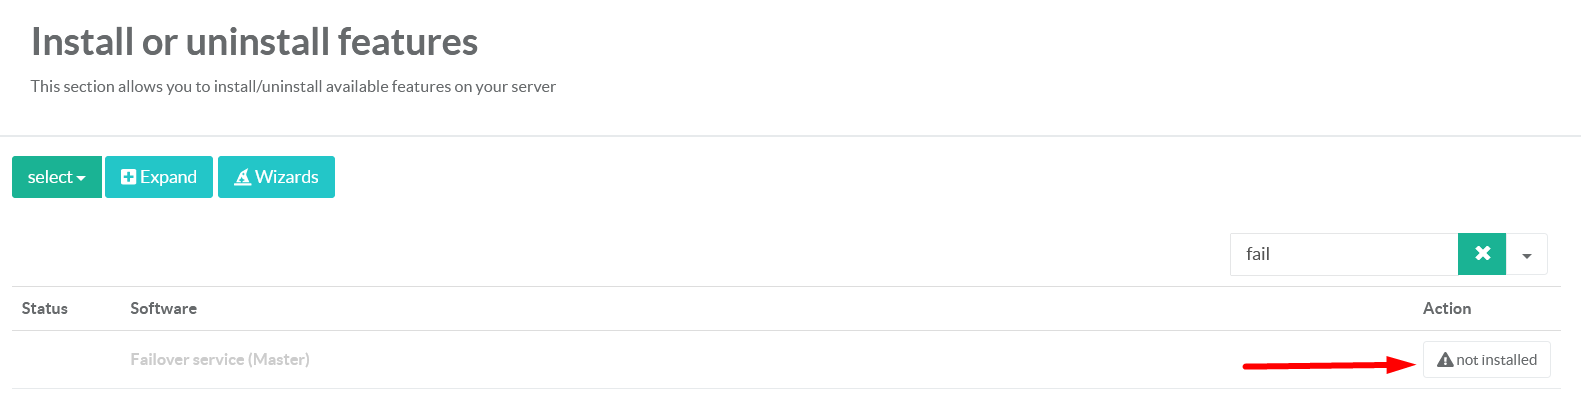
- On left menu, go to Your System -> Package Center
- On search type Failover
- Click on the button Install or Update in front of the package name
- It will open a new popup, select the version and click on button Install or Update