The file-server feature is installed through the Features section.
You must need to use the Samba Artica Package v4.24.5 minimal
This page walks you through the three steps that turn your Artica appliance into a full file server: enable the feature, update the Samba package, and install the Shares Engine. It takes about five minutes, and no command line beyond a single activation command.
When you are done, a new Files Sharing section appears in the left menu, and you are ready to create your first file-server instance.
¶ Before you start
| Requirement | Details |
|---|---|
| Artica version | Artica v4.50 SP8 or later, on Debian 12. Update the appliance and apply the latest hotfixes first. |
| Samba package | v4.24.5 minimum — installed at step 2 below. |
| Beta activation | The feature is still under development: it must be switched on once (step 1). |
| Network | Each file-server instance needs its own network interface. On a VM, add as many NICs as you plan to create instances; on bare metal, use the virtual switch feature. |
¶ Get the latest Samba version
- On the left menu, choose
Your System > Update > Packages Center - On the search field, type “Samba”
- Click on Install or update button on the “Samba TCP/IP Daemon"
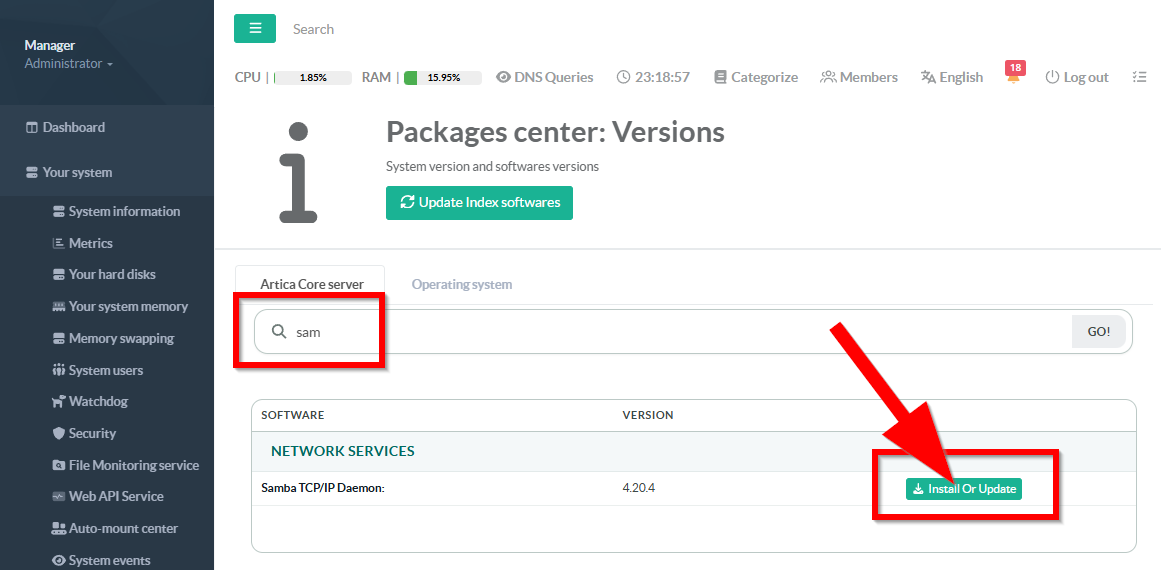
- Choose the latest version and click on Install or Upgrade button
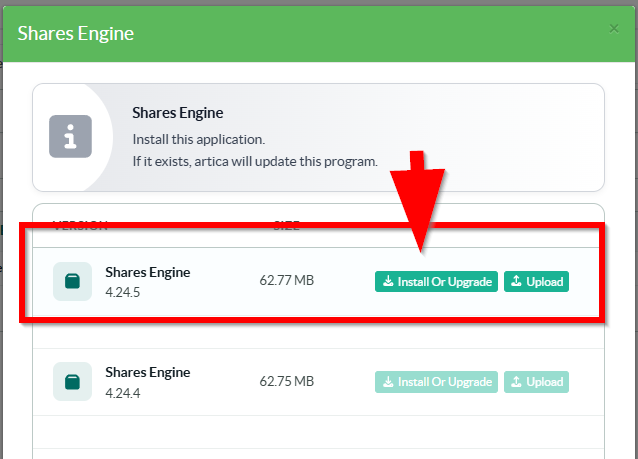
Do not skip this step: the Shares Engine relies on features that only exist from Samba package v4.24.5 onwards.
¶ Step 3 — Install the feature
- On the left menu, choose
Your system > Features - On the search field, type “shares"
- Click on Install on the Shares Engine row
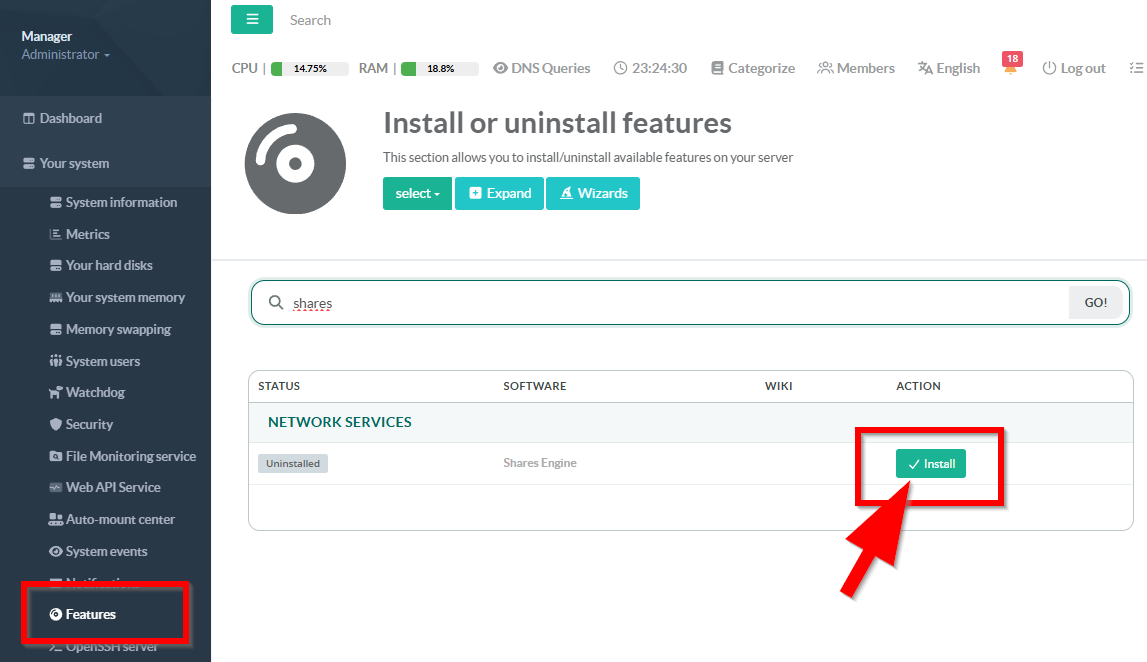
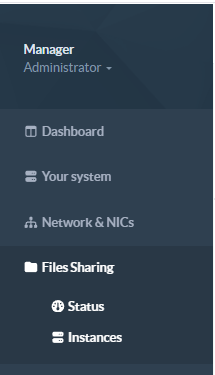
- You will see a new Files Sharing section on the left menu.
¶ What you have just installed
The Files Sharing section is where you create and manage your file-server instances. Once an instance is selected, each of these views applies to that instance only:
| Menu entry | What it does |
|---|---|
| Shares Center | Create shares, set access rules, enable the recycle bin, previous versions, auditing. |
| Users | File-sharing accounts and passwords for this instance. |
| Groups | Map Windows groups onto system groups, and use them in share permissions. |
| Folder security | Review the access rules that actually apply to a directory tree. |
| Live sessions | Connected clients, connected shares and open files, in real time — disconnect a client or close a share in one click. |
| Statistics | Sessions and I/O over 1 hour to 30 days, top users, Prometheus export. |
| Events | The instance log files, readable from the console — no SSH session required. |
¶ Next step: create your first instance
Open the Files Sharing section and create an instance. You will be asked for three things:
- a name — it is the server name Windows workstations will see on the network;
- a network interface and IP address — the instance gets its own address, independent from the appliance;
- a members database — where its users come from: Local, OpenLDAP, Active Directory (domain member) or AD Domain Controller.
Start the instance, add a share, and it is immediately reachable from Windows Explorer at \\<instance name> or \\<instance IP>. Repeat as many times as you need: each new instance is fully isolated from the others.
¶ Troubleshooting
| Symptom | What to check |
|---|---|
| The Shares Engine row does not appear in the Features section | The activation command of step 1 has not been run, or the console page was not reloaded afterwards. Run it again, then refresh your browser. |
| No Files Sharing entry in the left menu after installing | Reload the Web Console: the left menu is built at page load. If it still does not show, verify that the Shares Engine feature is reported as installed. |
| The feature installs, but instances fail to start | Check the Samba package version — it must be v4.24.5 or later. Go back to step 2 and install the latest version. |
| An instance starts, but Windows cannot reach the share | Verify that the instance has been given its own network interface and a free IP address on your LAN, and that no other host uses that address. |